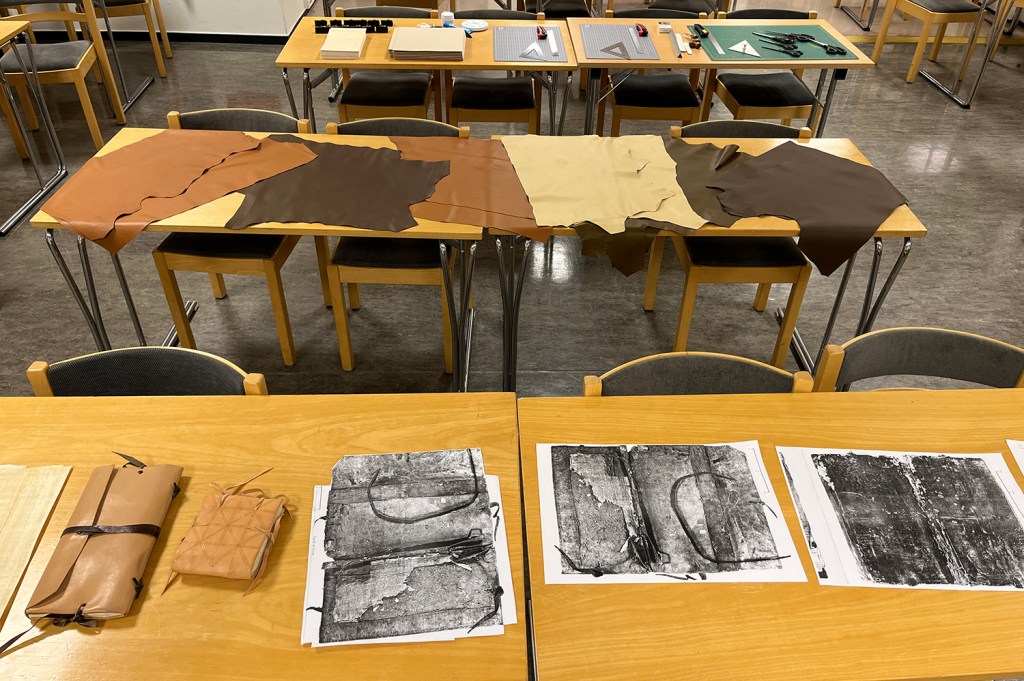
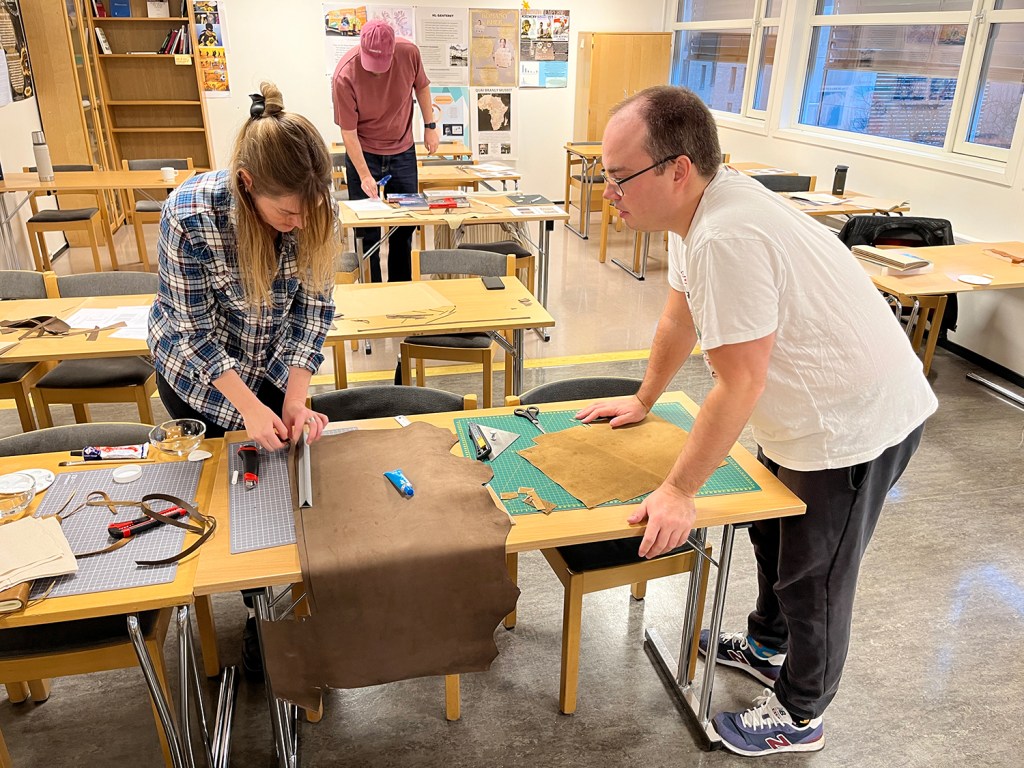
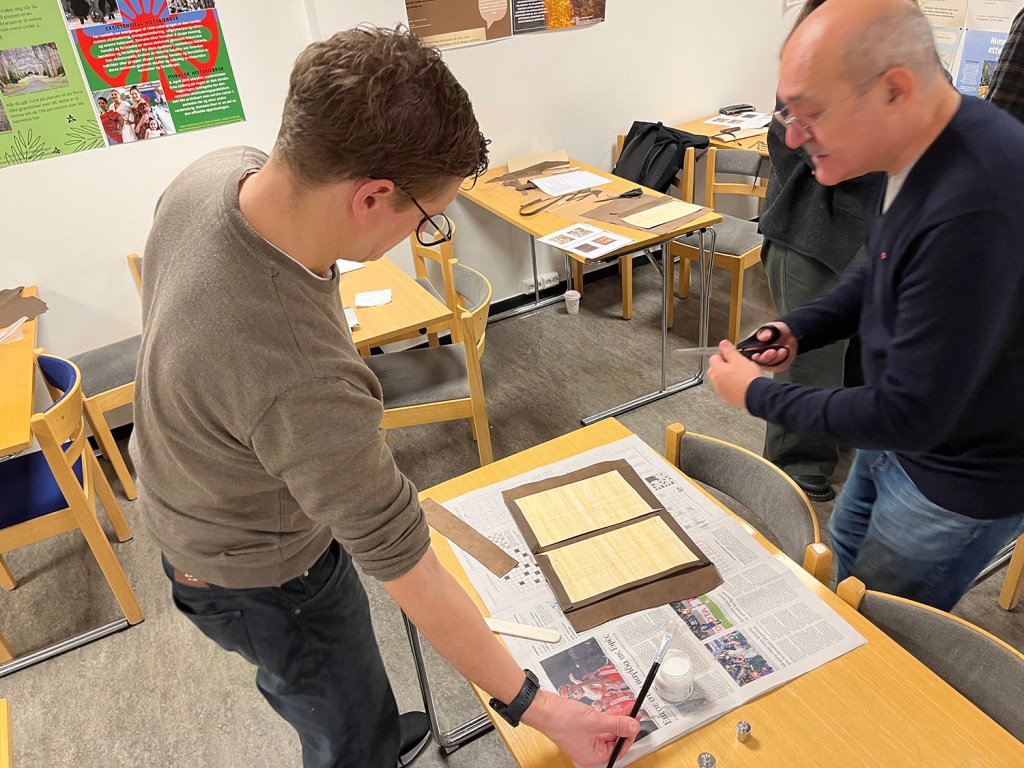
Yesterday the EthiCodex team had a visit from the book conservator and historian of bindings, Georgios Boudalis. He led a workshop in which we made models of a single-quire codex (Nag Hammadi Codex VI).
Making a model always involves choices of both materials and methods. In this case, we had a day to do the workshop, and we wanted to focus on understanding the basic structures of the Nag-Hammadi-style binding. So, we wanted to use fairly easy-to-work-with materials. Paper made for a more pliable quire and pared leather made for easier folding and pasting. The papyrus-mache boards for the covers were replaced with papyrus-lined poster board.
We relied on the photos and descriptions in James Robinson’s facsimile edition of the Nag Hammadi codices and Julia Miller’s chapter on the covers in Meeting by Accident.
The results were very nice looking books that give a sense of the size and feel of an early single-quire codex.
It was an enjoyable day with lots of good conversations about the ins and outs of single-quire codices. Thanks to Georgios and all the participants!
Part 3: Carbon black, red earth, and hyperspectral imaging
Carbon black and red earth
Carbon black is considered the most commonly used black ink in antiquity and the preferred ink when applied on a papyrus substrate. Essentially, carbon black ink is made of fine amorphous carbon particles dispersed in water with the help of a binding medium.
The most commonly used binding medium for ink production is gum Arabic, a natural gum produced from the trees of the Acacia species.
Gum arabic exuding from the Babhul tree (Vachellia nilotica). Photo: Ashwin Baindur, Wikipedia commons (CC BY-SA 4.0).
Even though carbon black is today considered a widely available and relatively cheap colourant, this does not seem to be the case in antiquity. Several starting materials were used to create the valuable ink (or pigment) known in Latin as atramentum, including wood, fruits, resins, and bones. The process of pyrolysis to produce amorphous carbon particles was not considered trivial and according to literary sources, specialised workshops were organised for this purpose, as described by Vitruvius (De arch. 7.10):
“A vaulted apartment is built like a sweating chamber, and is covered carefully with a marble facing and smoothed down. In front of it a small furnace is built with outlets into the chamber, and the mouth of the furnace is carefully enclosed so that the flame does not escape. Resin is placed in the furnace. Now the fiery potency burns it and compels it to emit soot through the outlets into the chamber. The soot clings round the walls and vaulting of the chamber. It is then collected and in part compounded with gum and worked up for the use of writing ink; the rest is mixed with size and used by fresco-painters for colouring walls.“
Vitruvius, On Architecture, Book 7, Chapter 10 (translated by F. Granger).
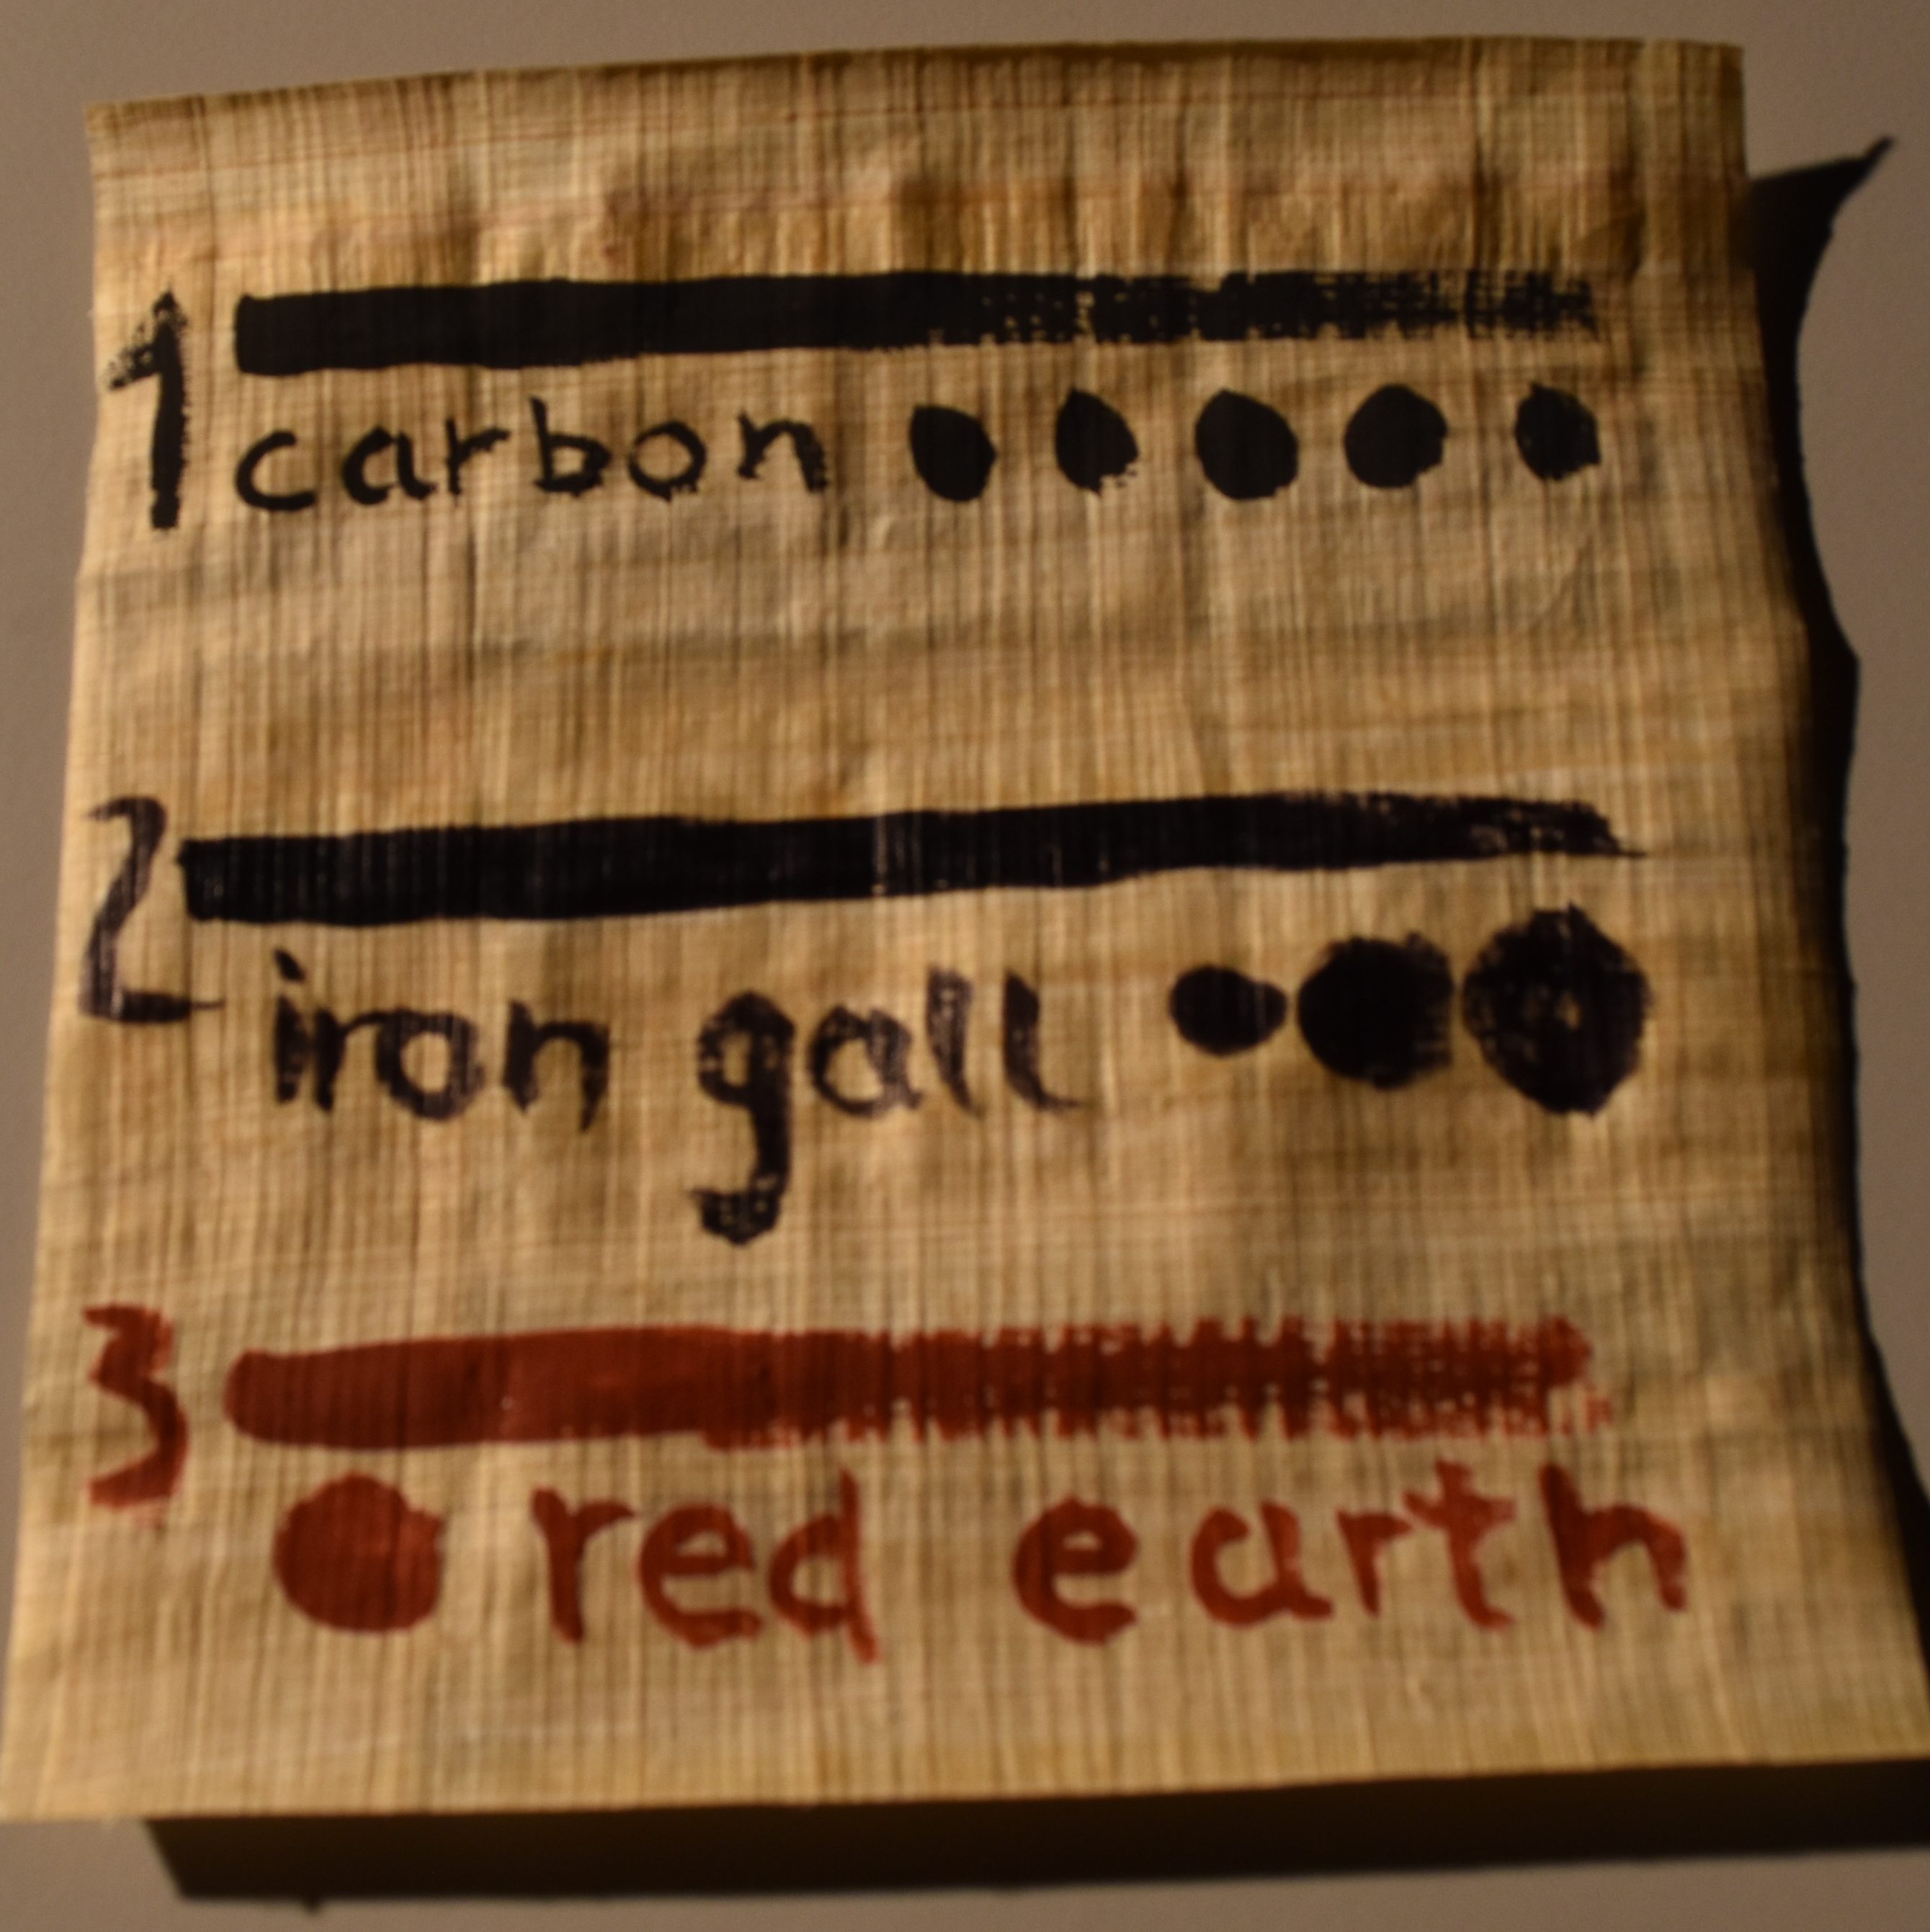
Ingredients for carbon black ink
5 g lamp black (Kremer Pigmente, n. 47250)
5 g untreated gum arabic (Kremer Pigmente, n. 63300)
30 mL distilled water
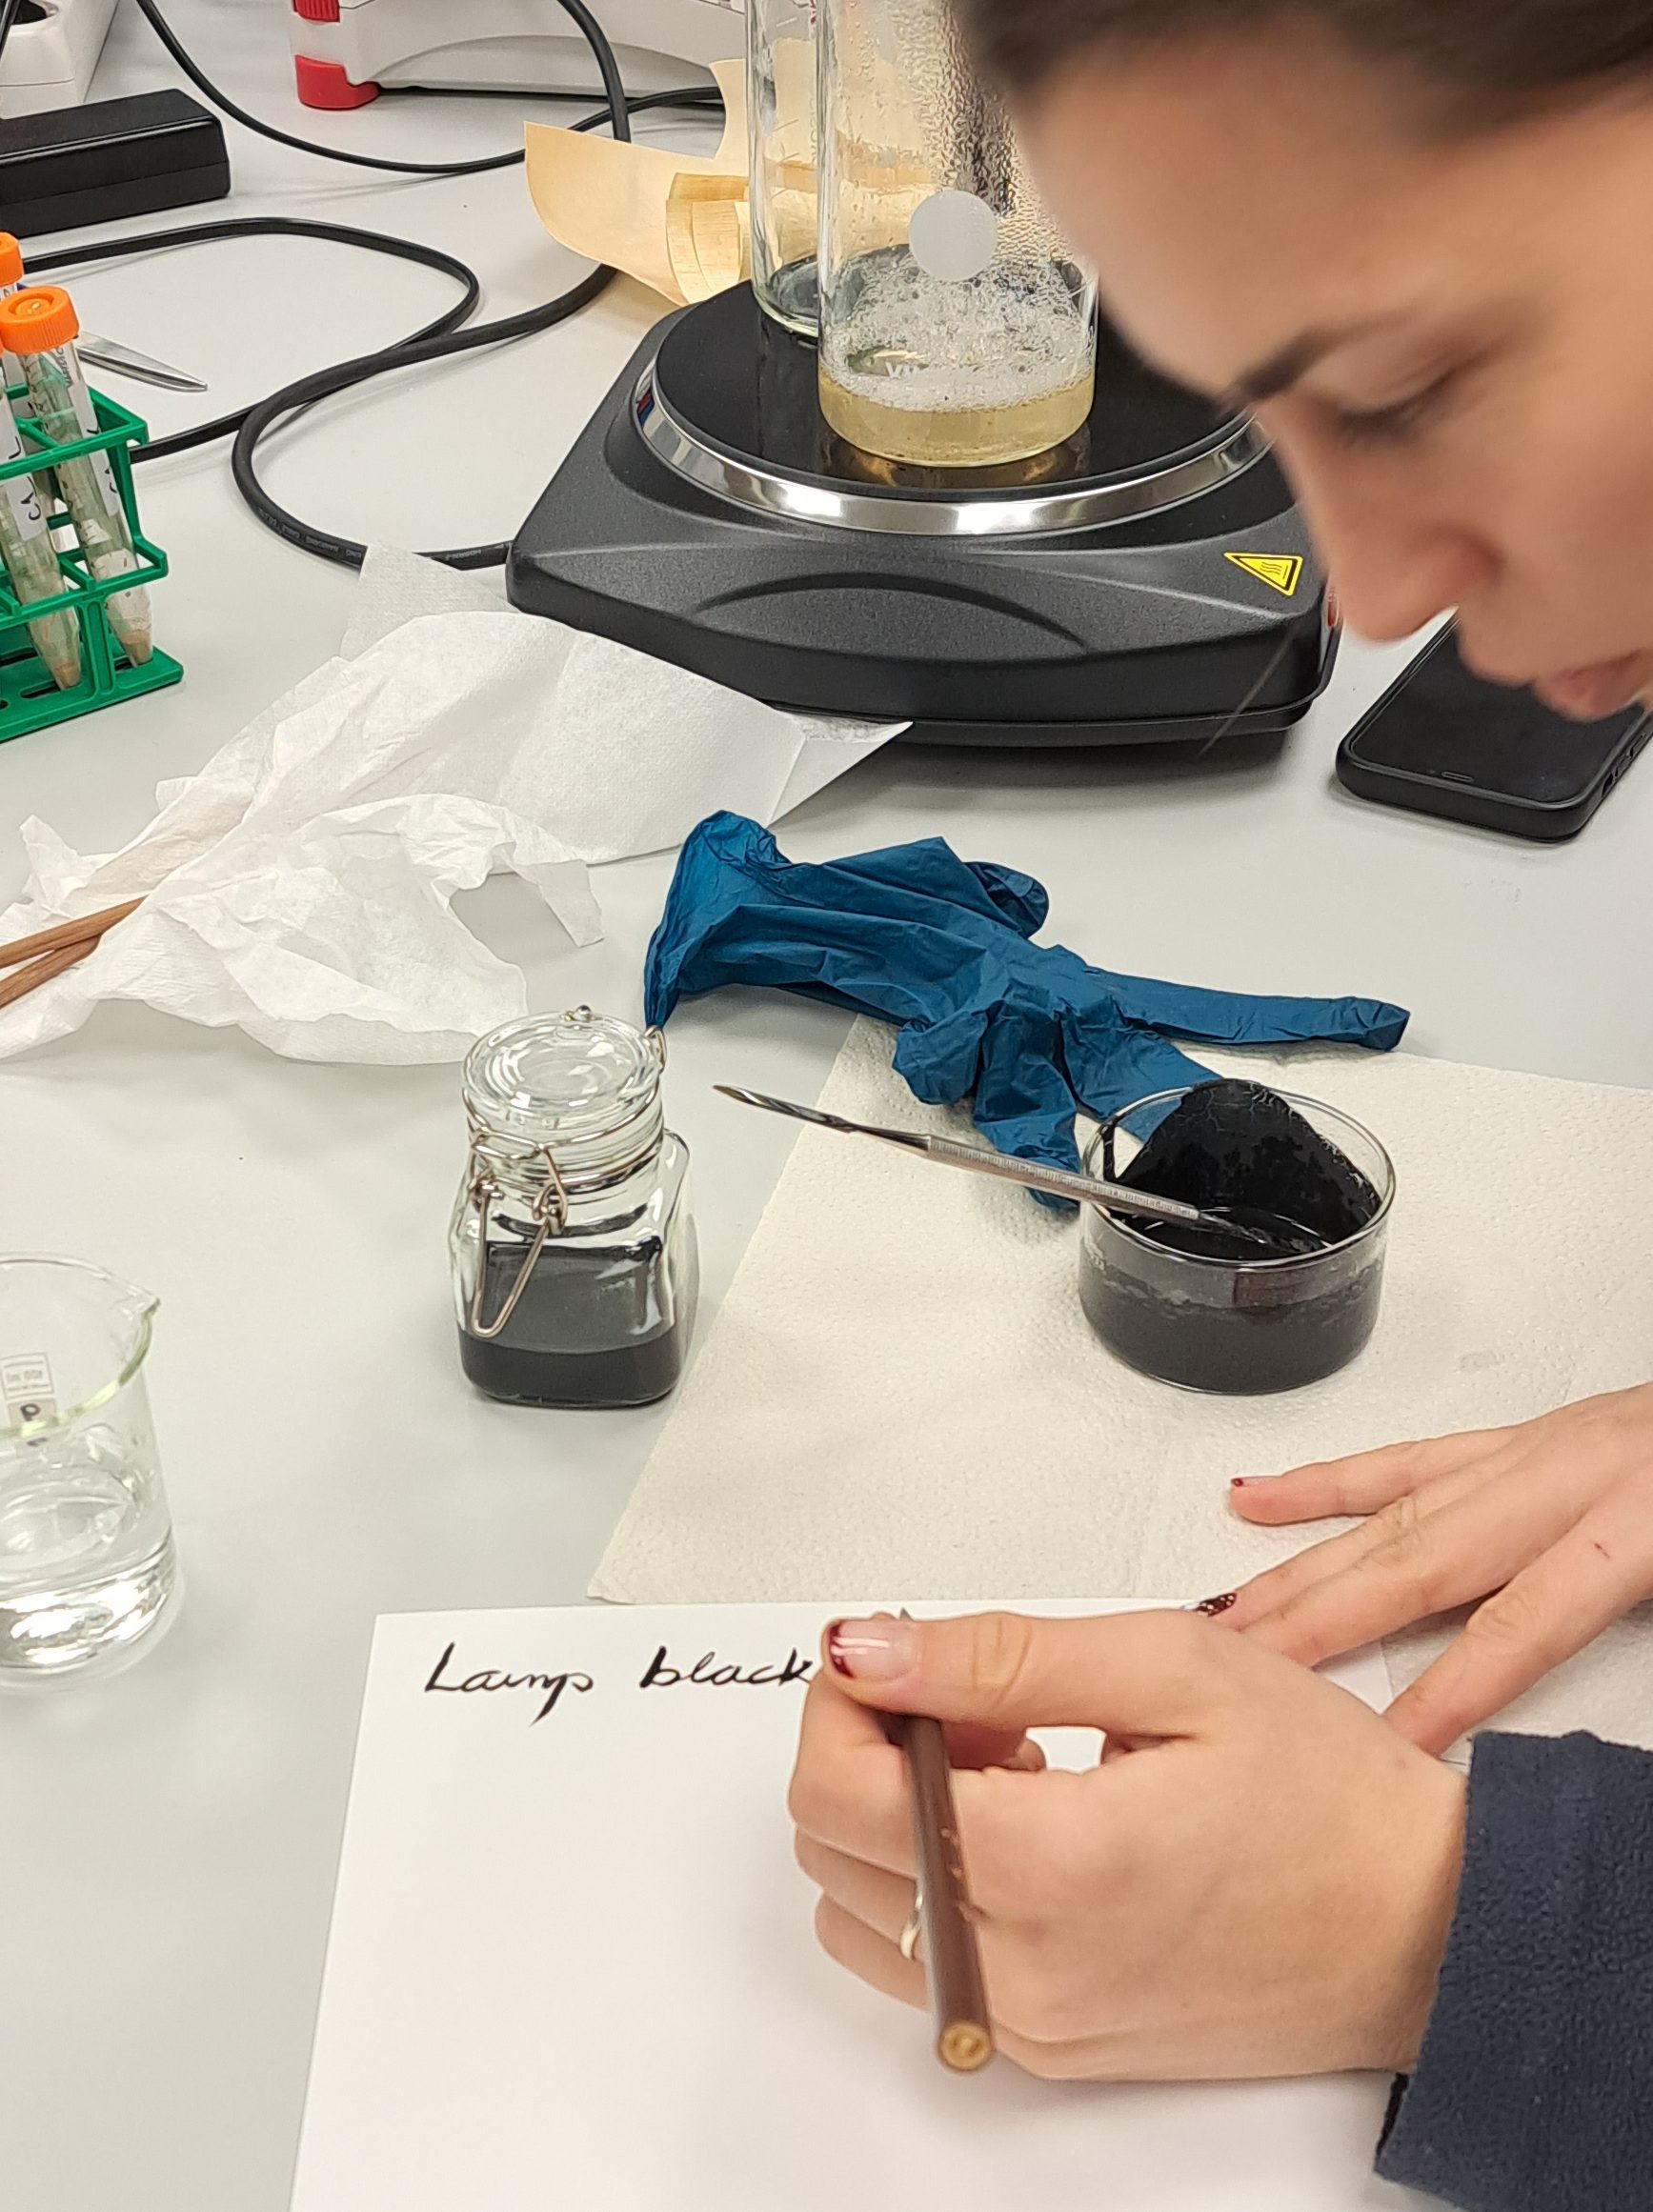
For the production of our carbon black ink, we used commercially available lamp black since we could not at this stage experiment with pyrolysis.
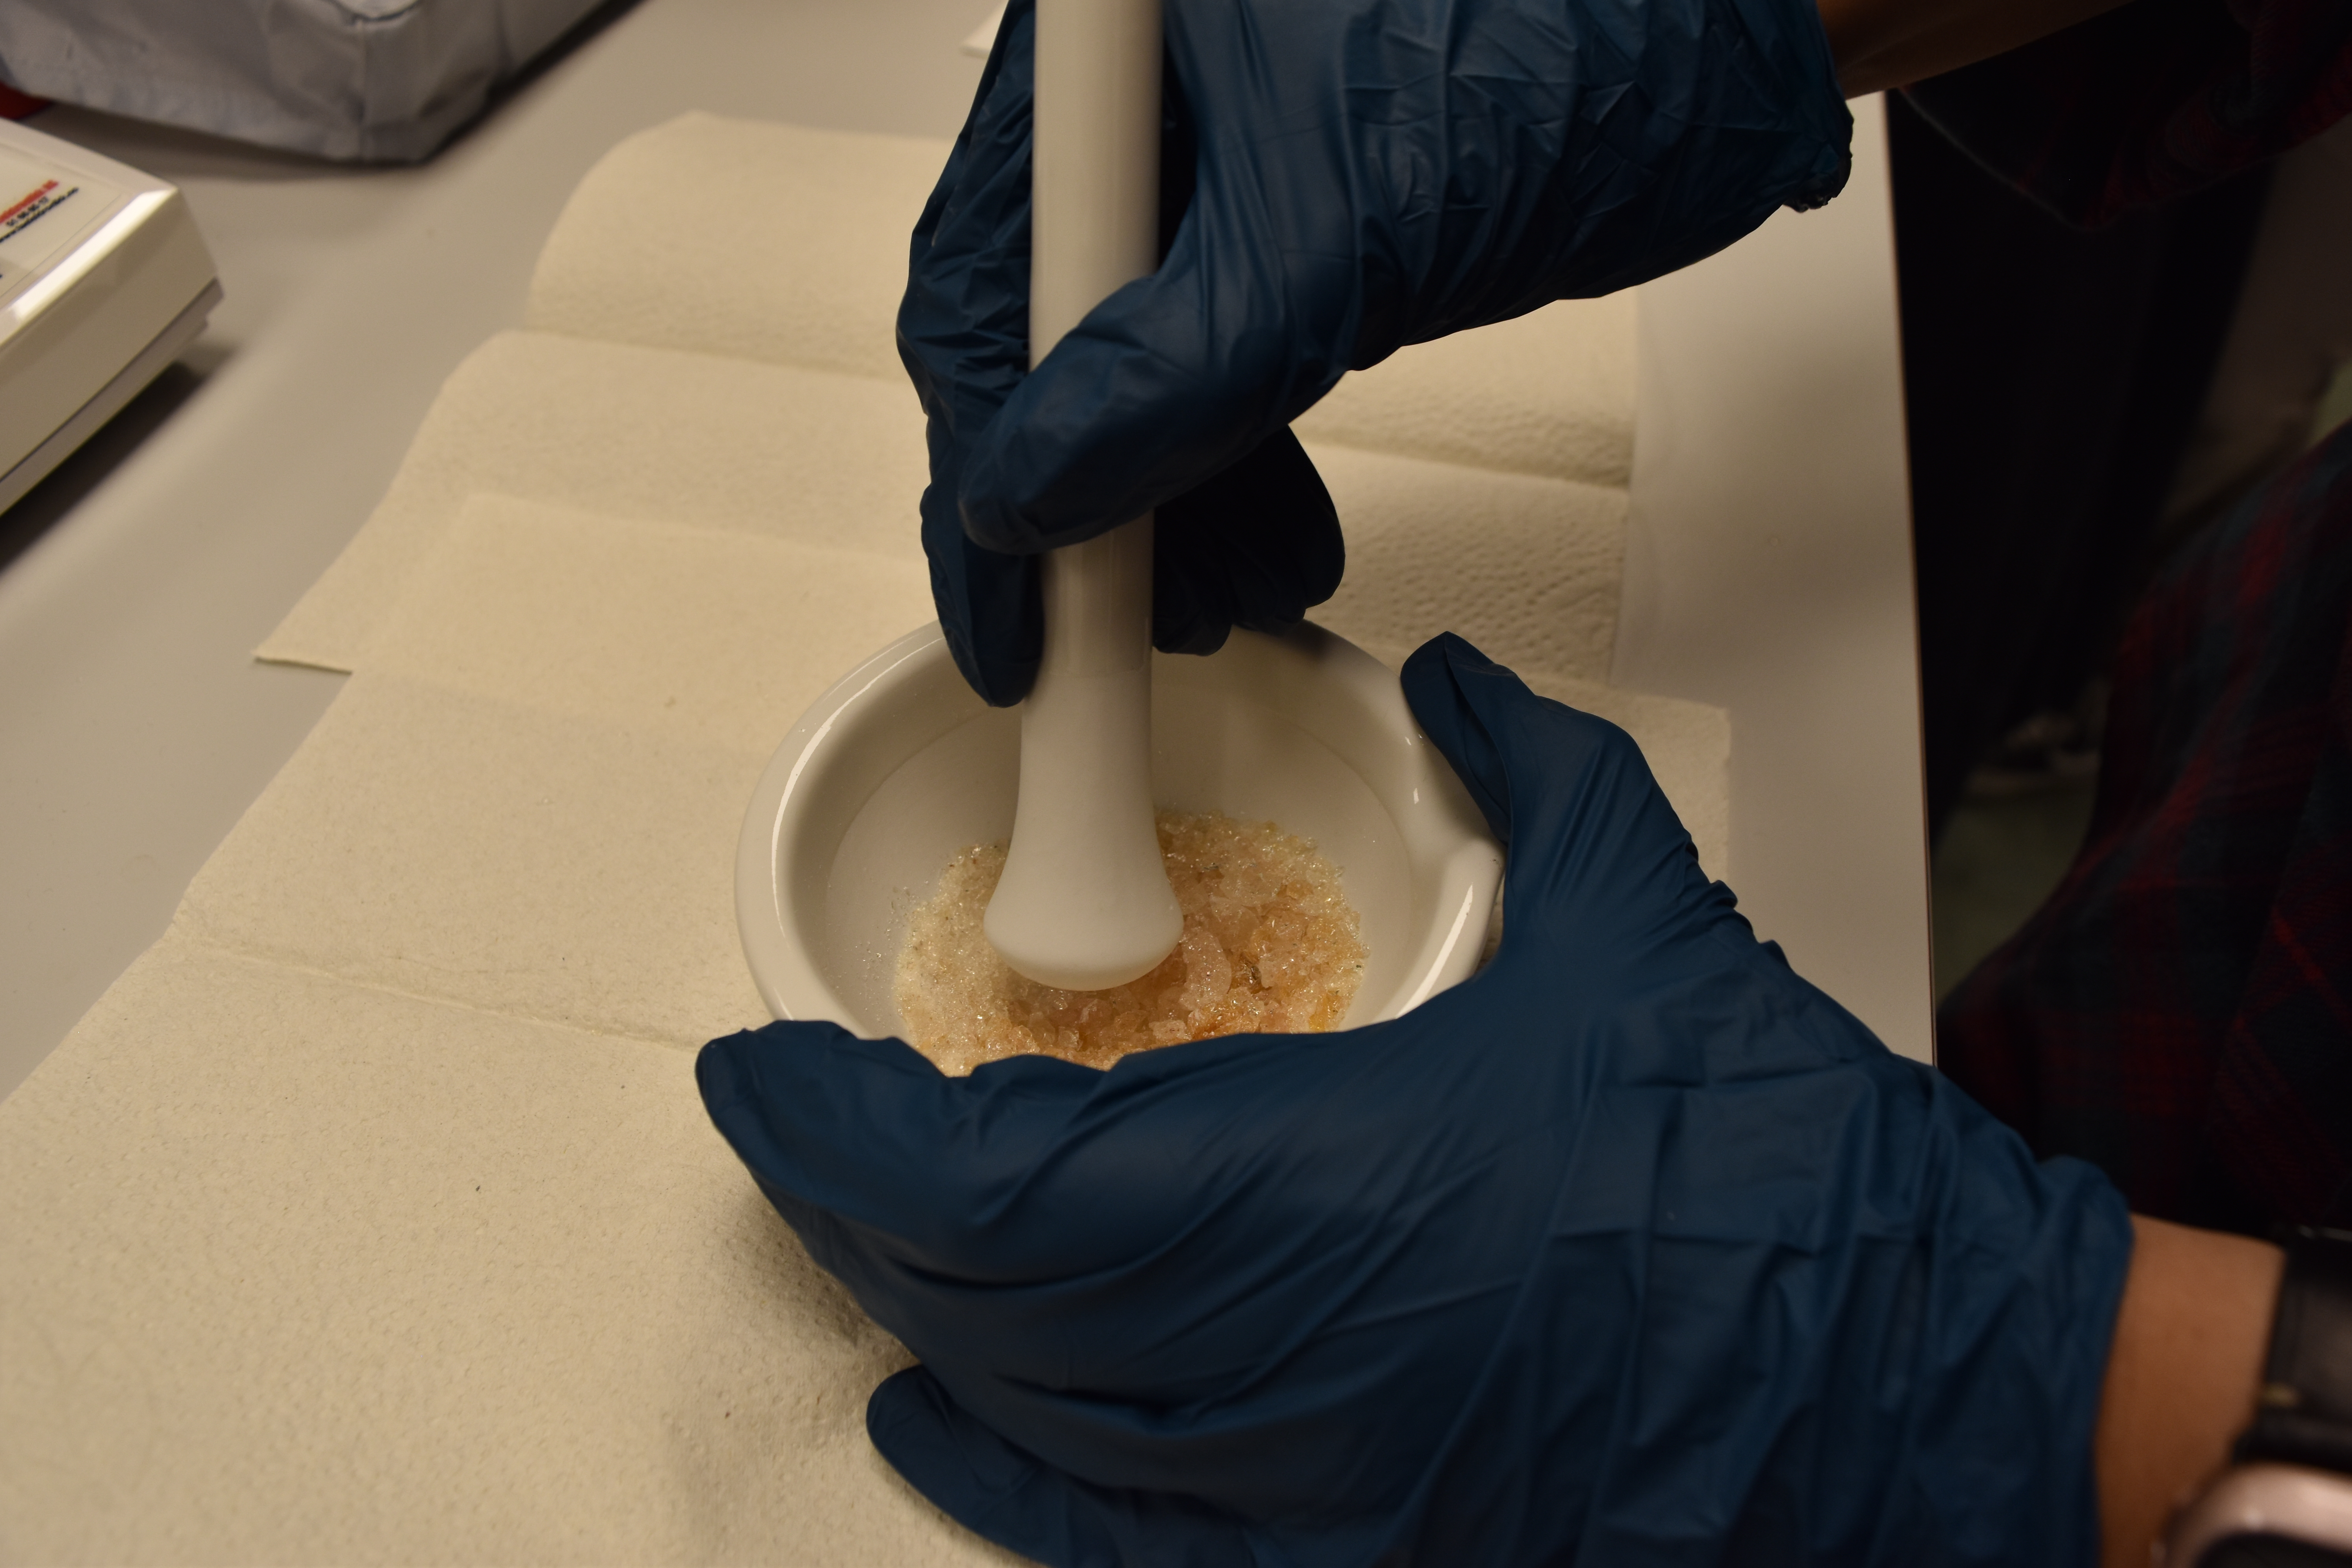
We worked with whole, untreated lumps of gum arabic to experience the process of grinding, taking turns until we got the desired result.
The grinding process was not particularly demanding and in about 10 minutes we were satisfied with the results.
We worked with a larger quantity than what was required for our recipe, starting with 25 g of gum which we dissolved in 150 mL of lukewarm distilled water. The dissolution of the powdered gum in water with the aid of a hotplate was a relatively easy and fast process.
Untreated gum arabic solution (photo AKM).
We noticed that in contrast to the powdered material purchased from the same supplier that we used for the manufacture of iron gall ink (part 2), the untreated lumps of gum arabic enclose small pieces of bark or other foreign material, which we decided to remove using a coffee filter.
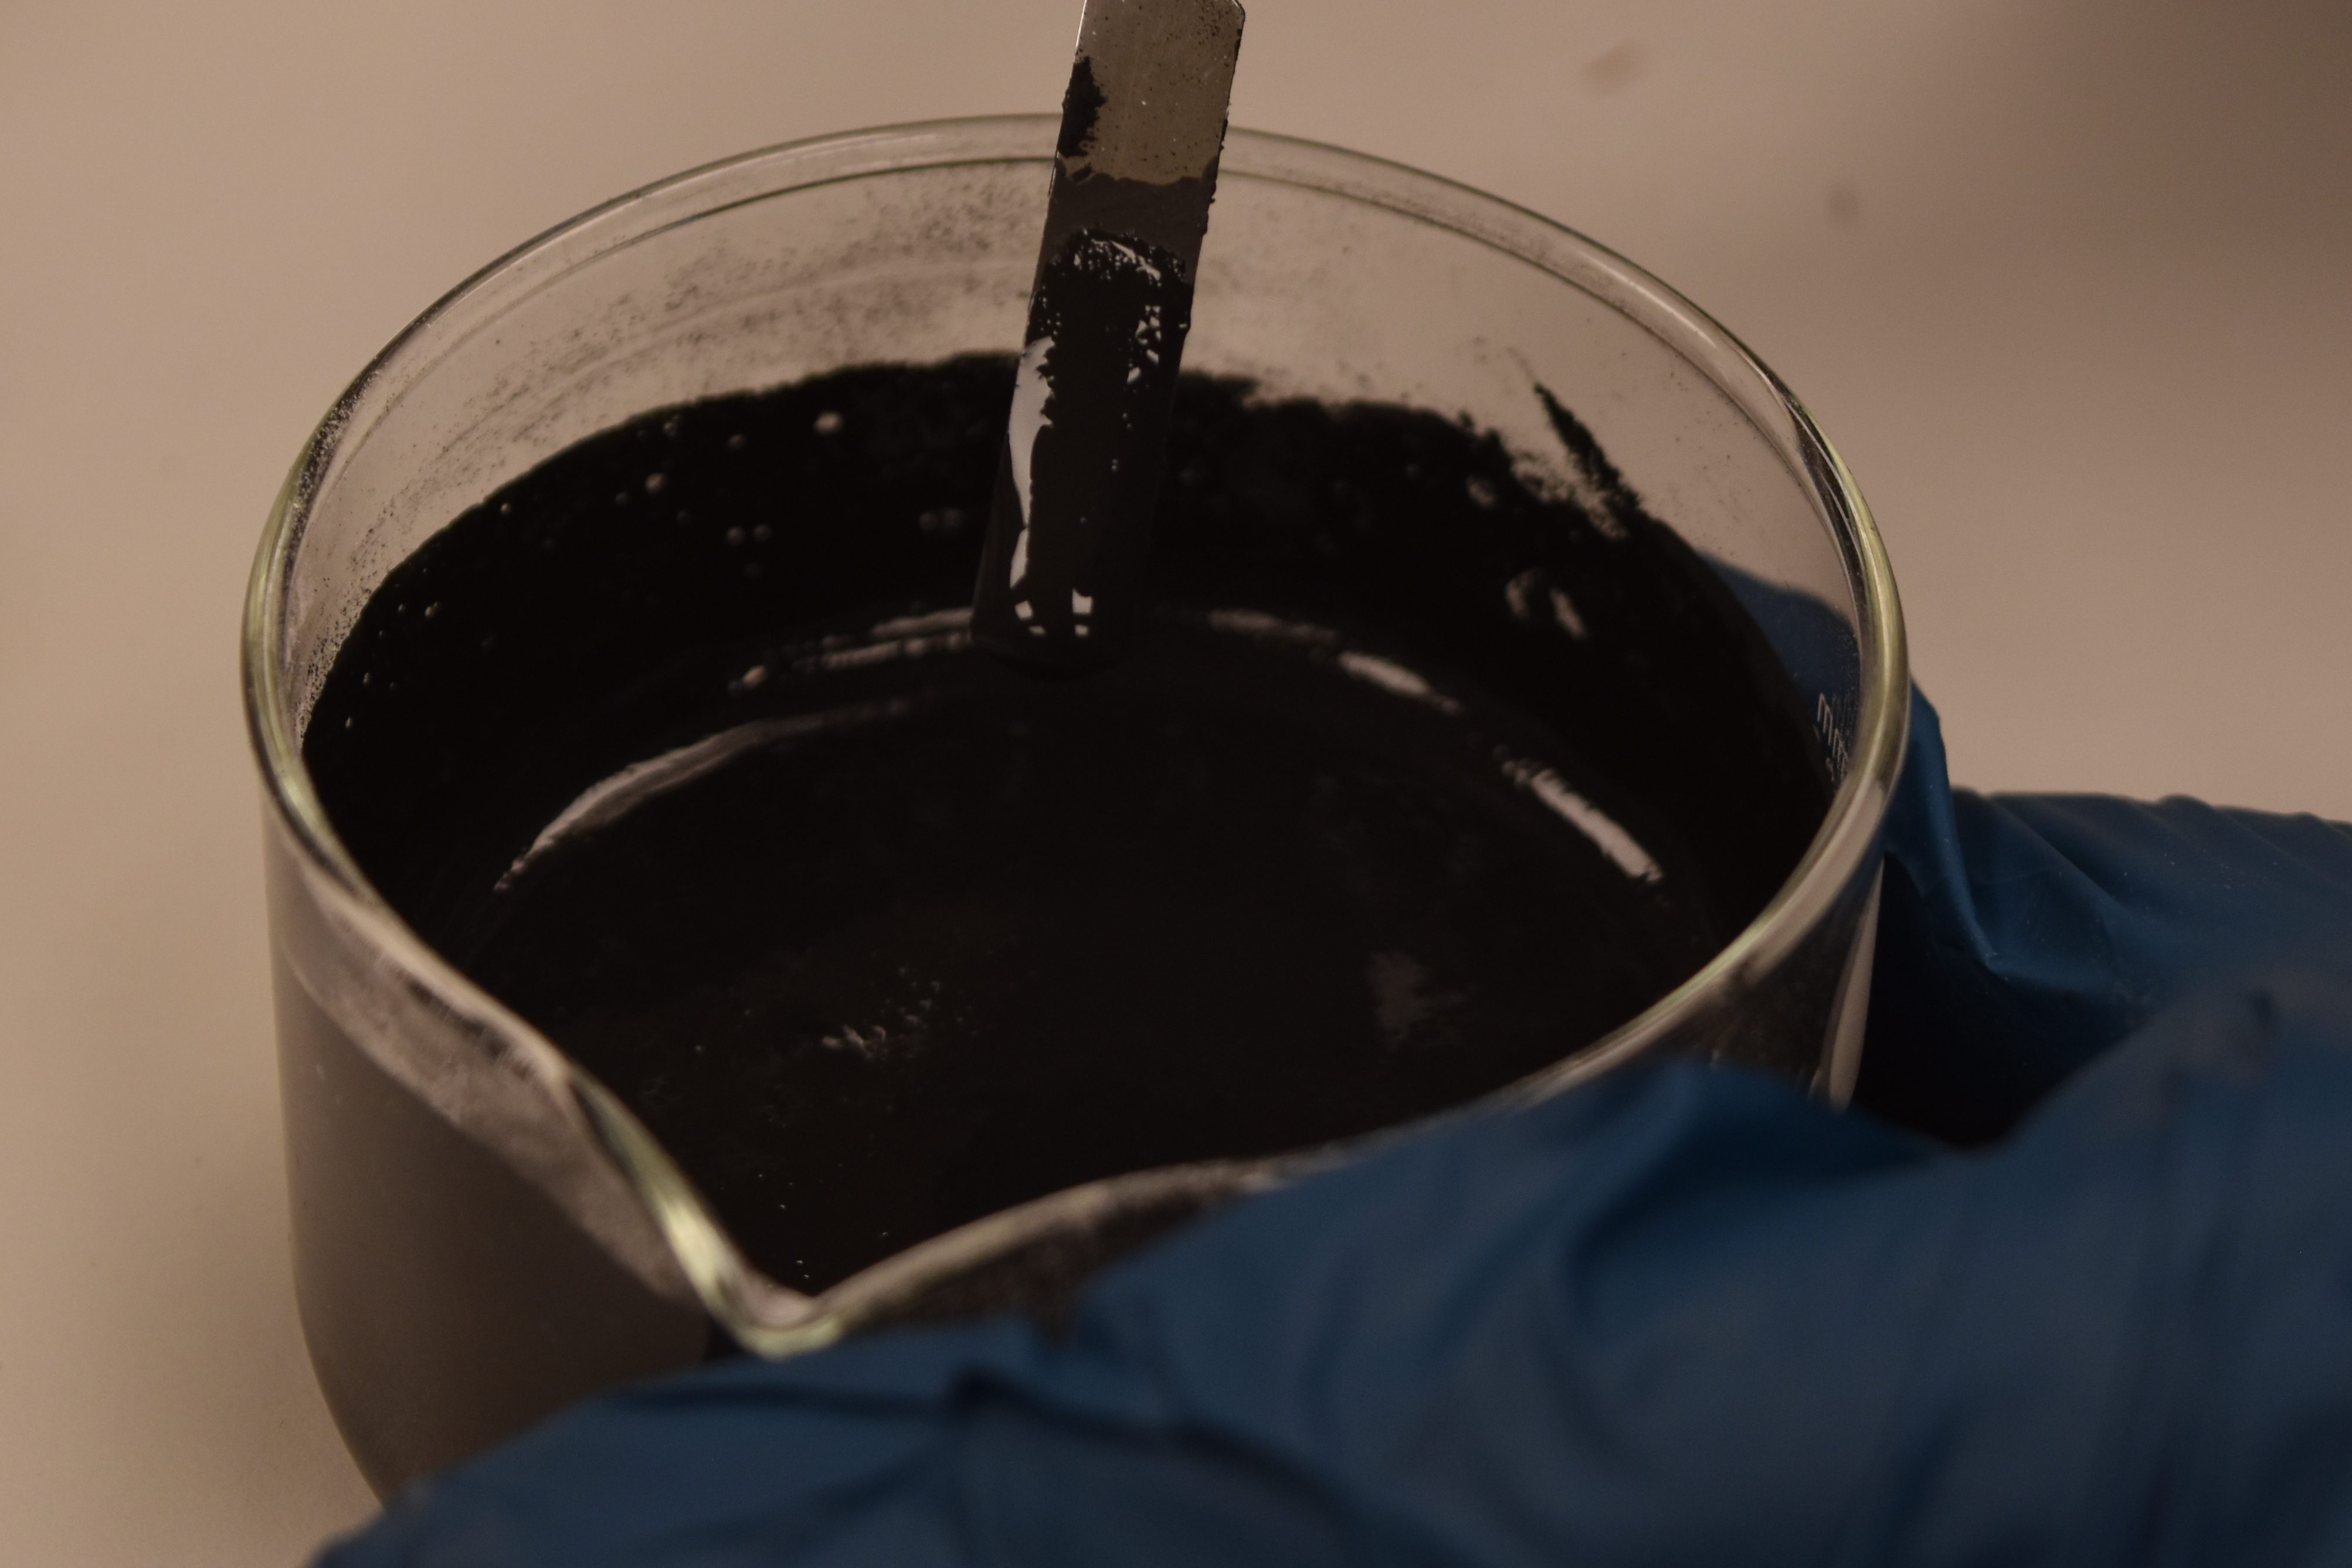
By mixing the gum arabic solution with lamp black, an intensely black ink was created.
Carbon black ink (photo AKM).Despina testing lamp black.
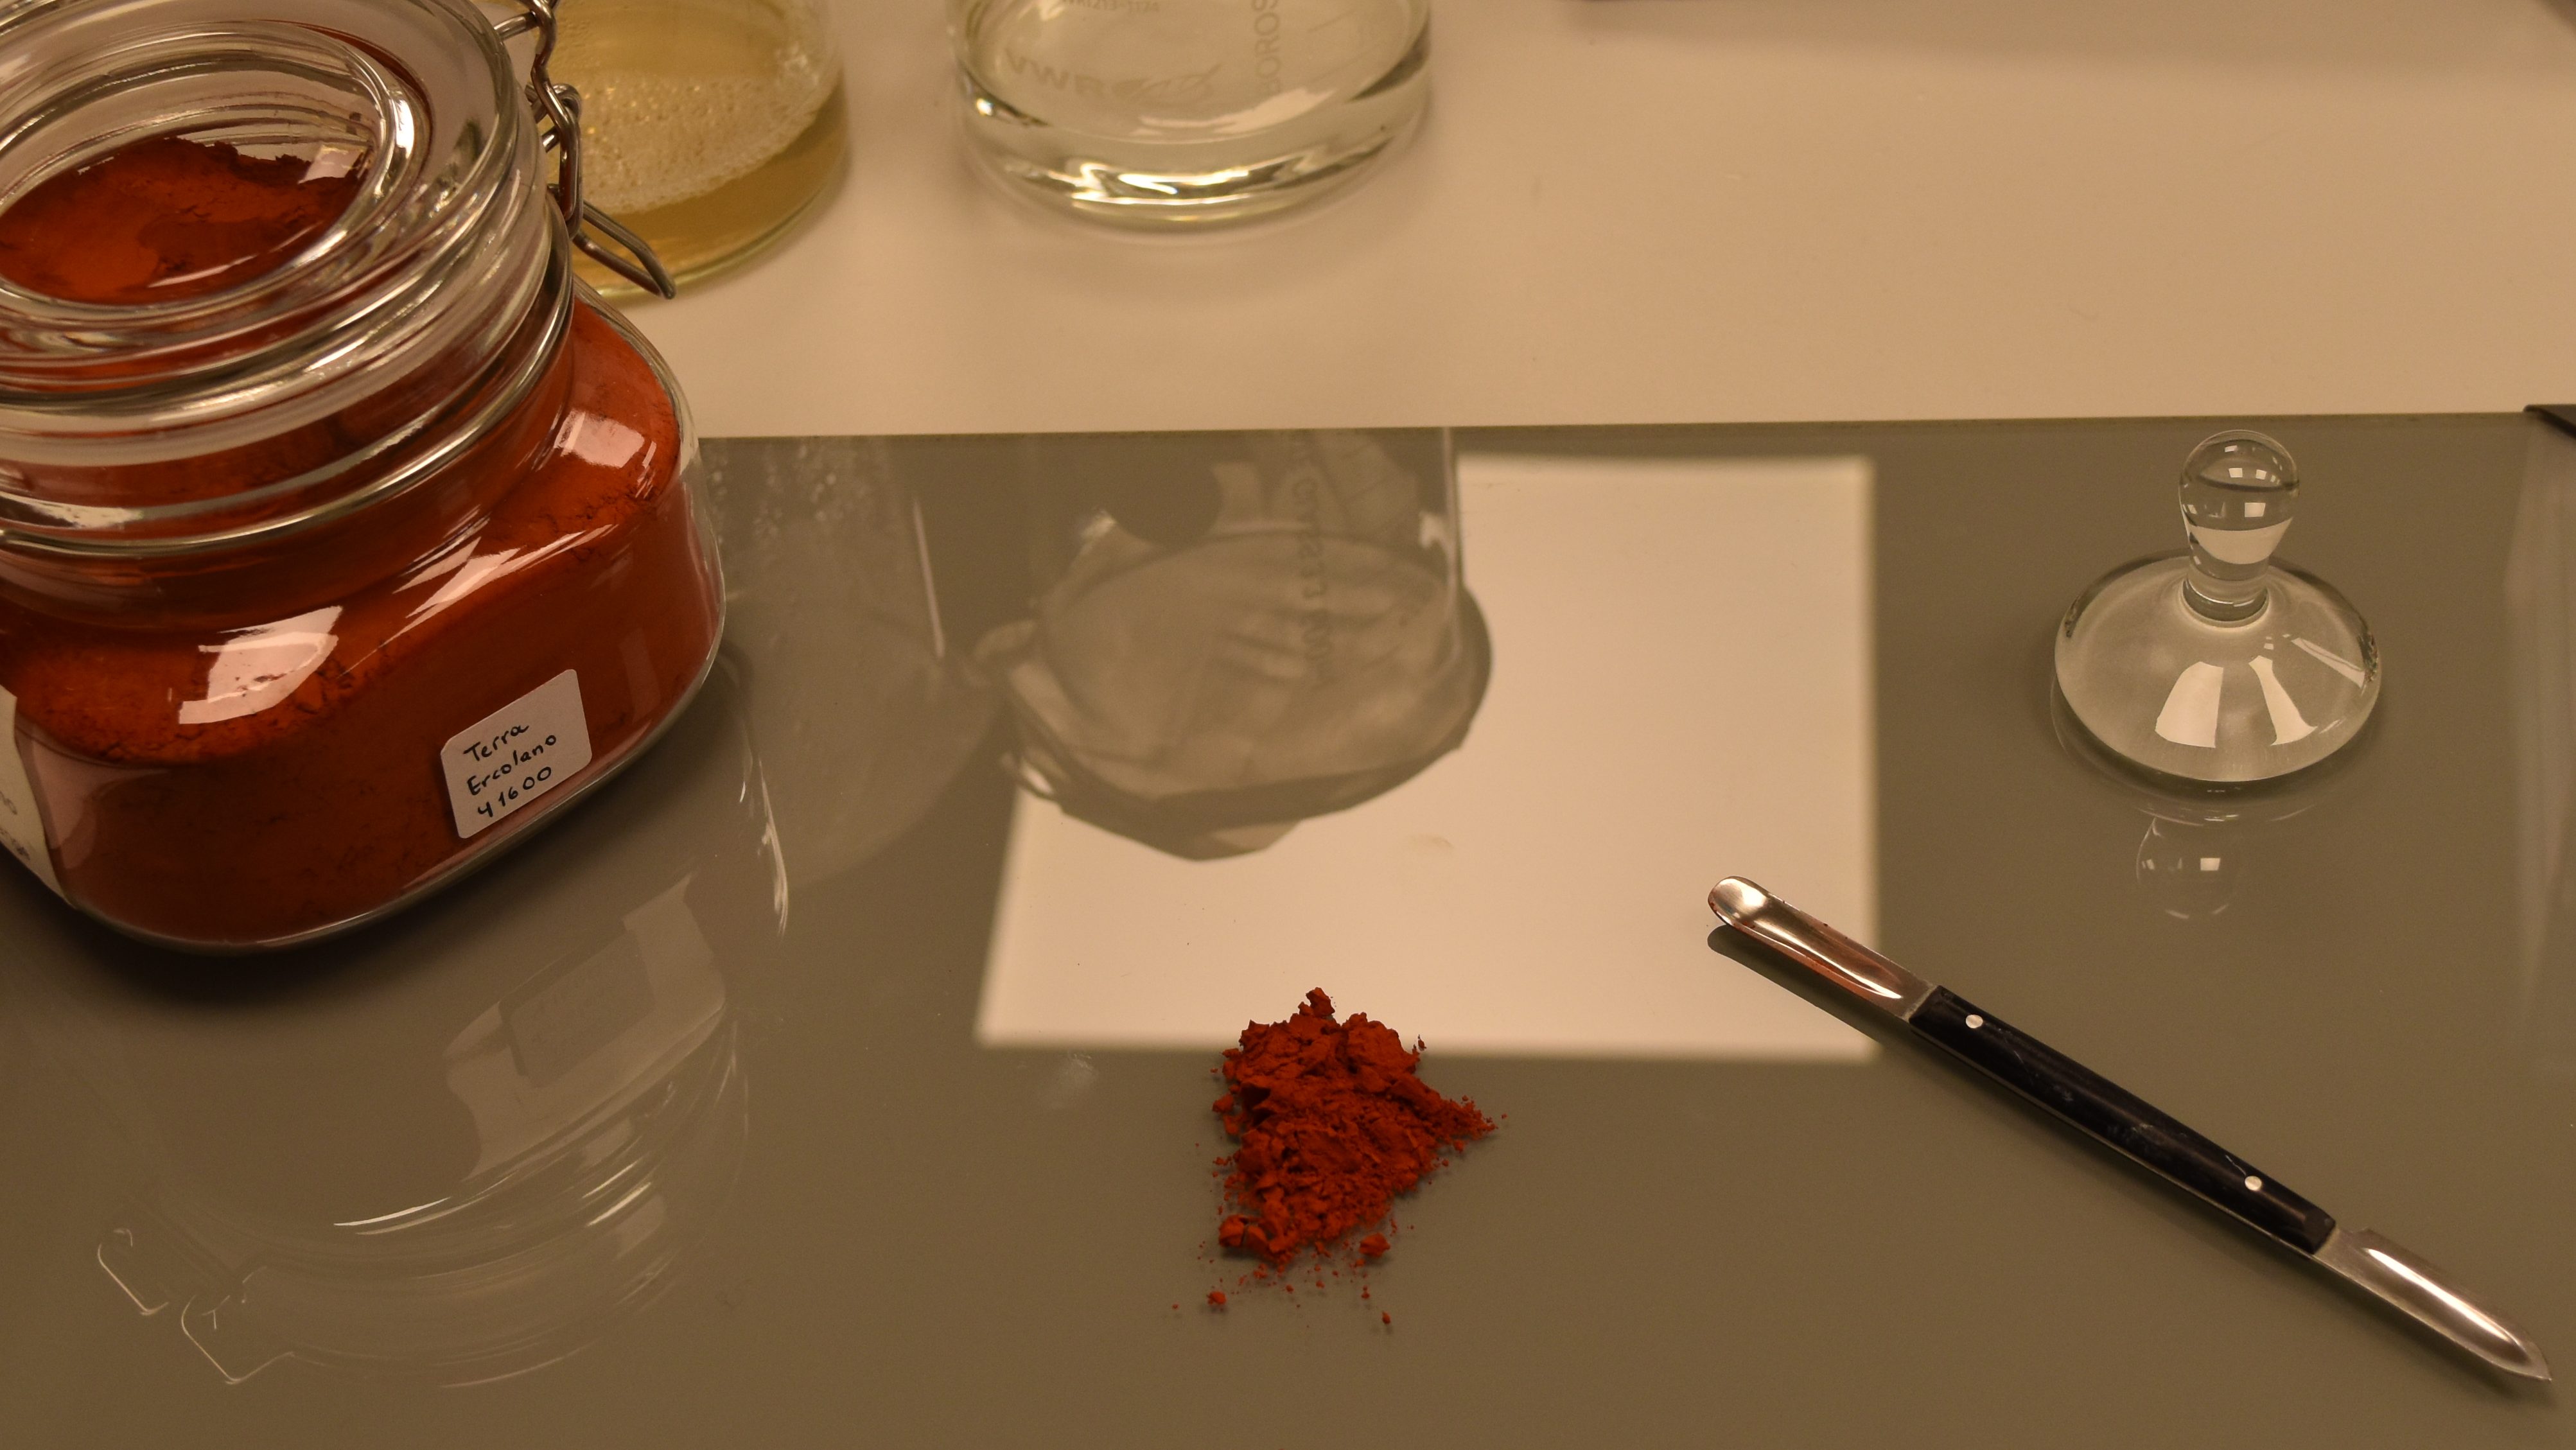
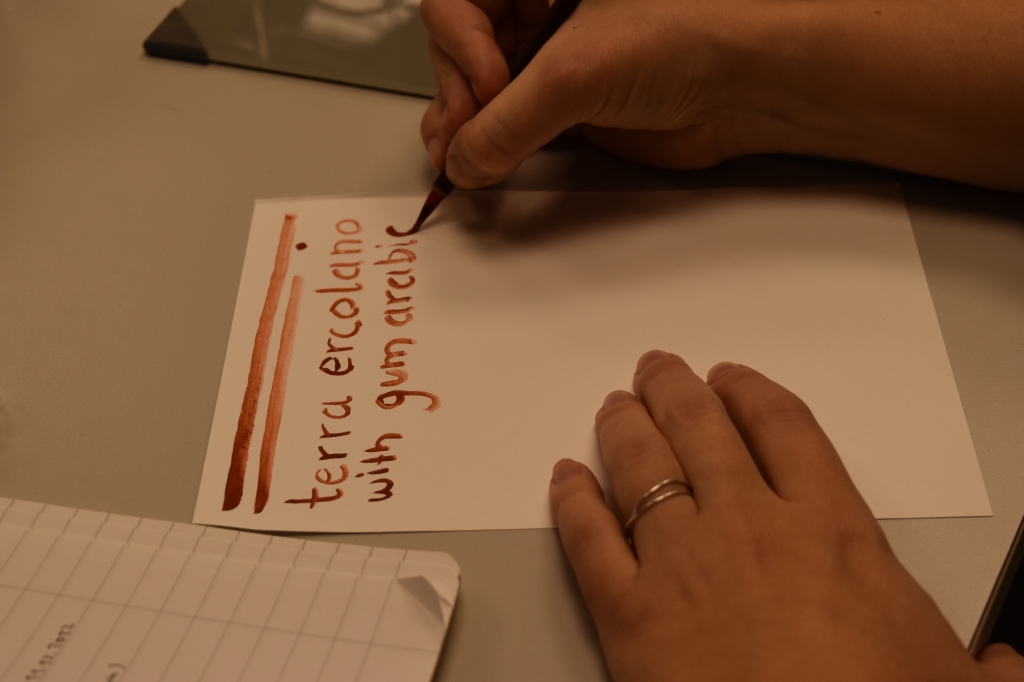
Finally, we used a commercially available red earth, consisting of a mixture of iron oxides (Terra Ercolano, Kremer pigmente, n. 41600) for the red ink. To produce our ink, we simply mixed the powdered mineral iron oxide with gum arabic and water.
Mixing red earth with gum arabic solution (photo: AKM).Testing the inks (photo: DW).
Hyperspectral imaging
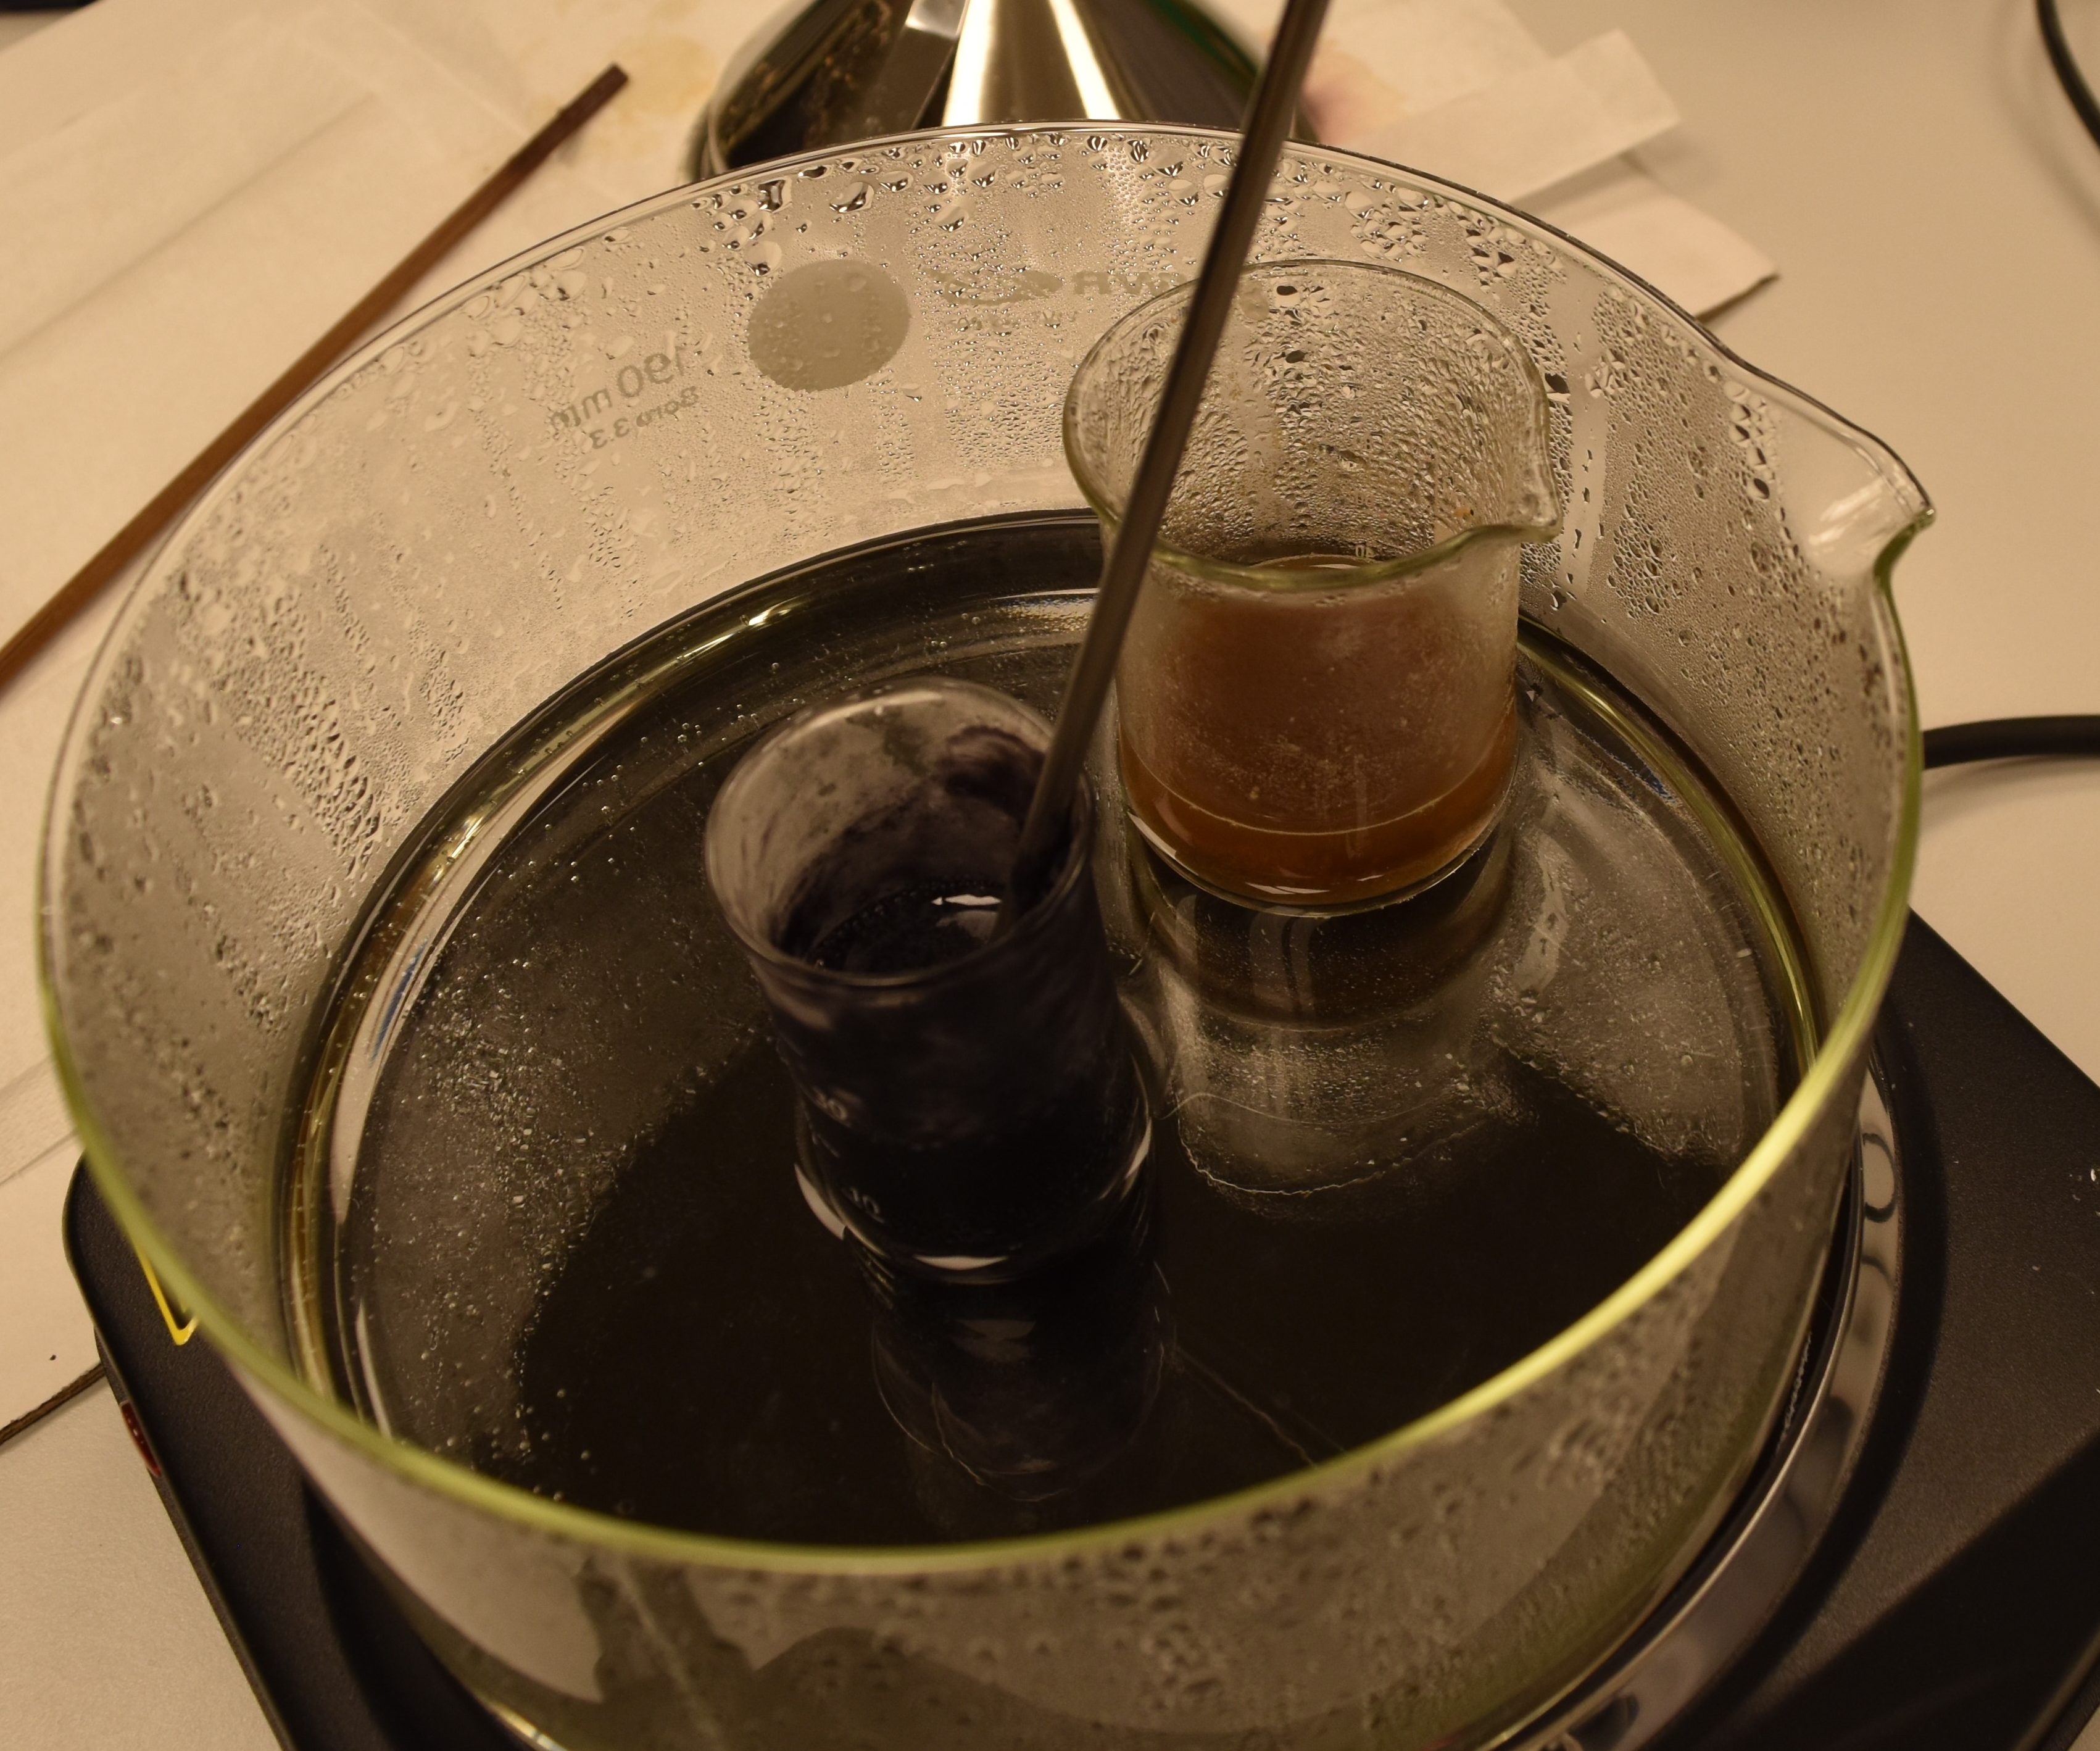
Our mock-ups were now ready to measure!
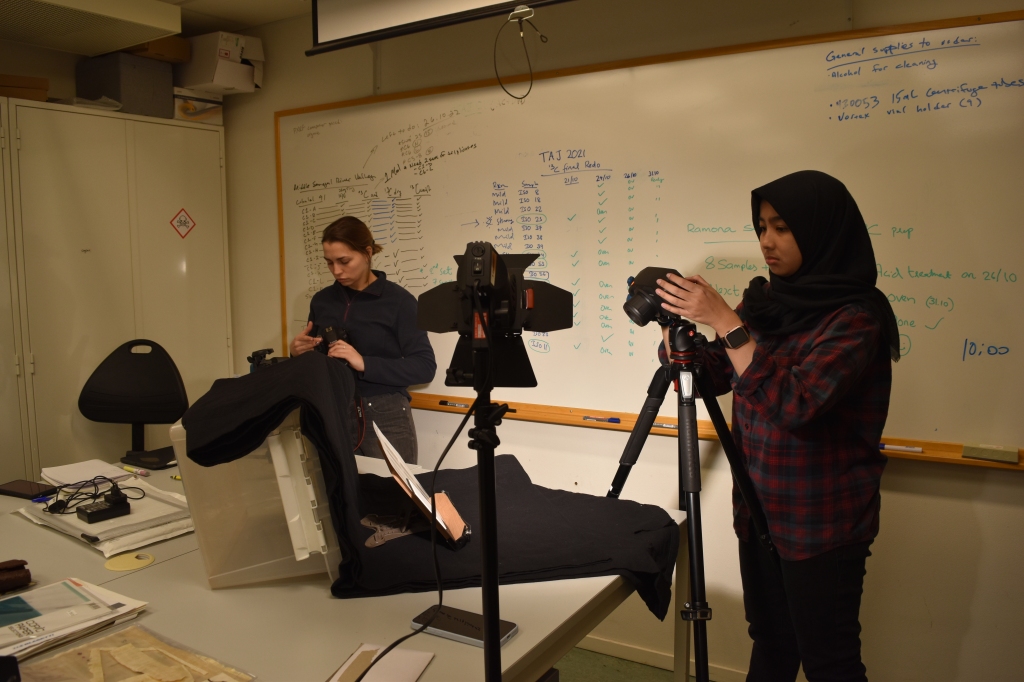
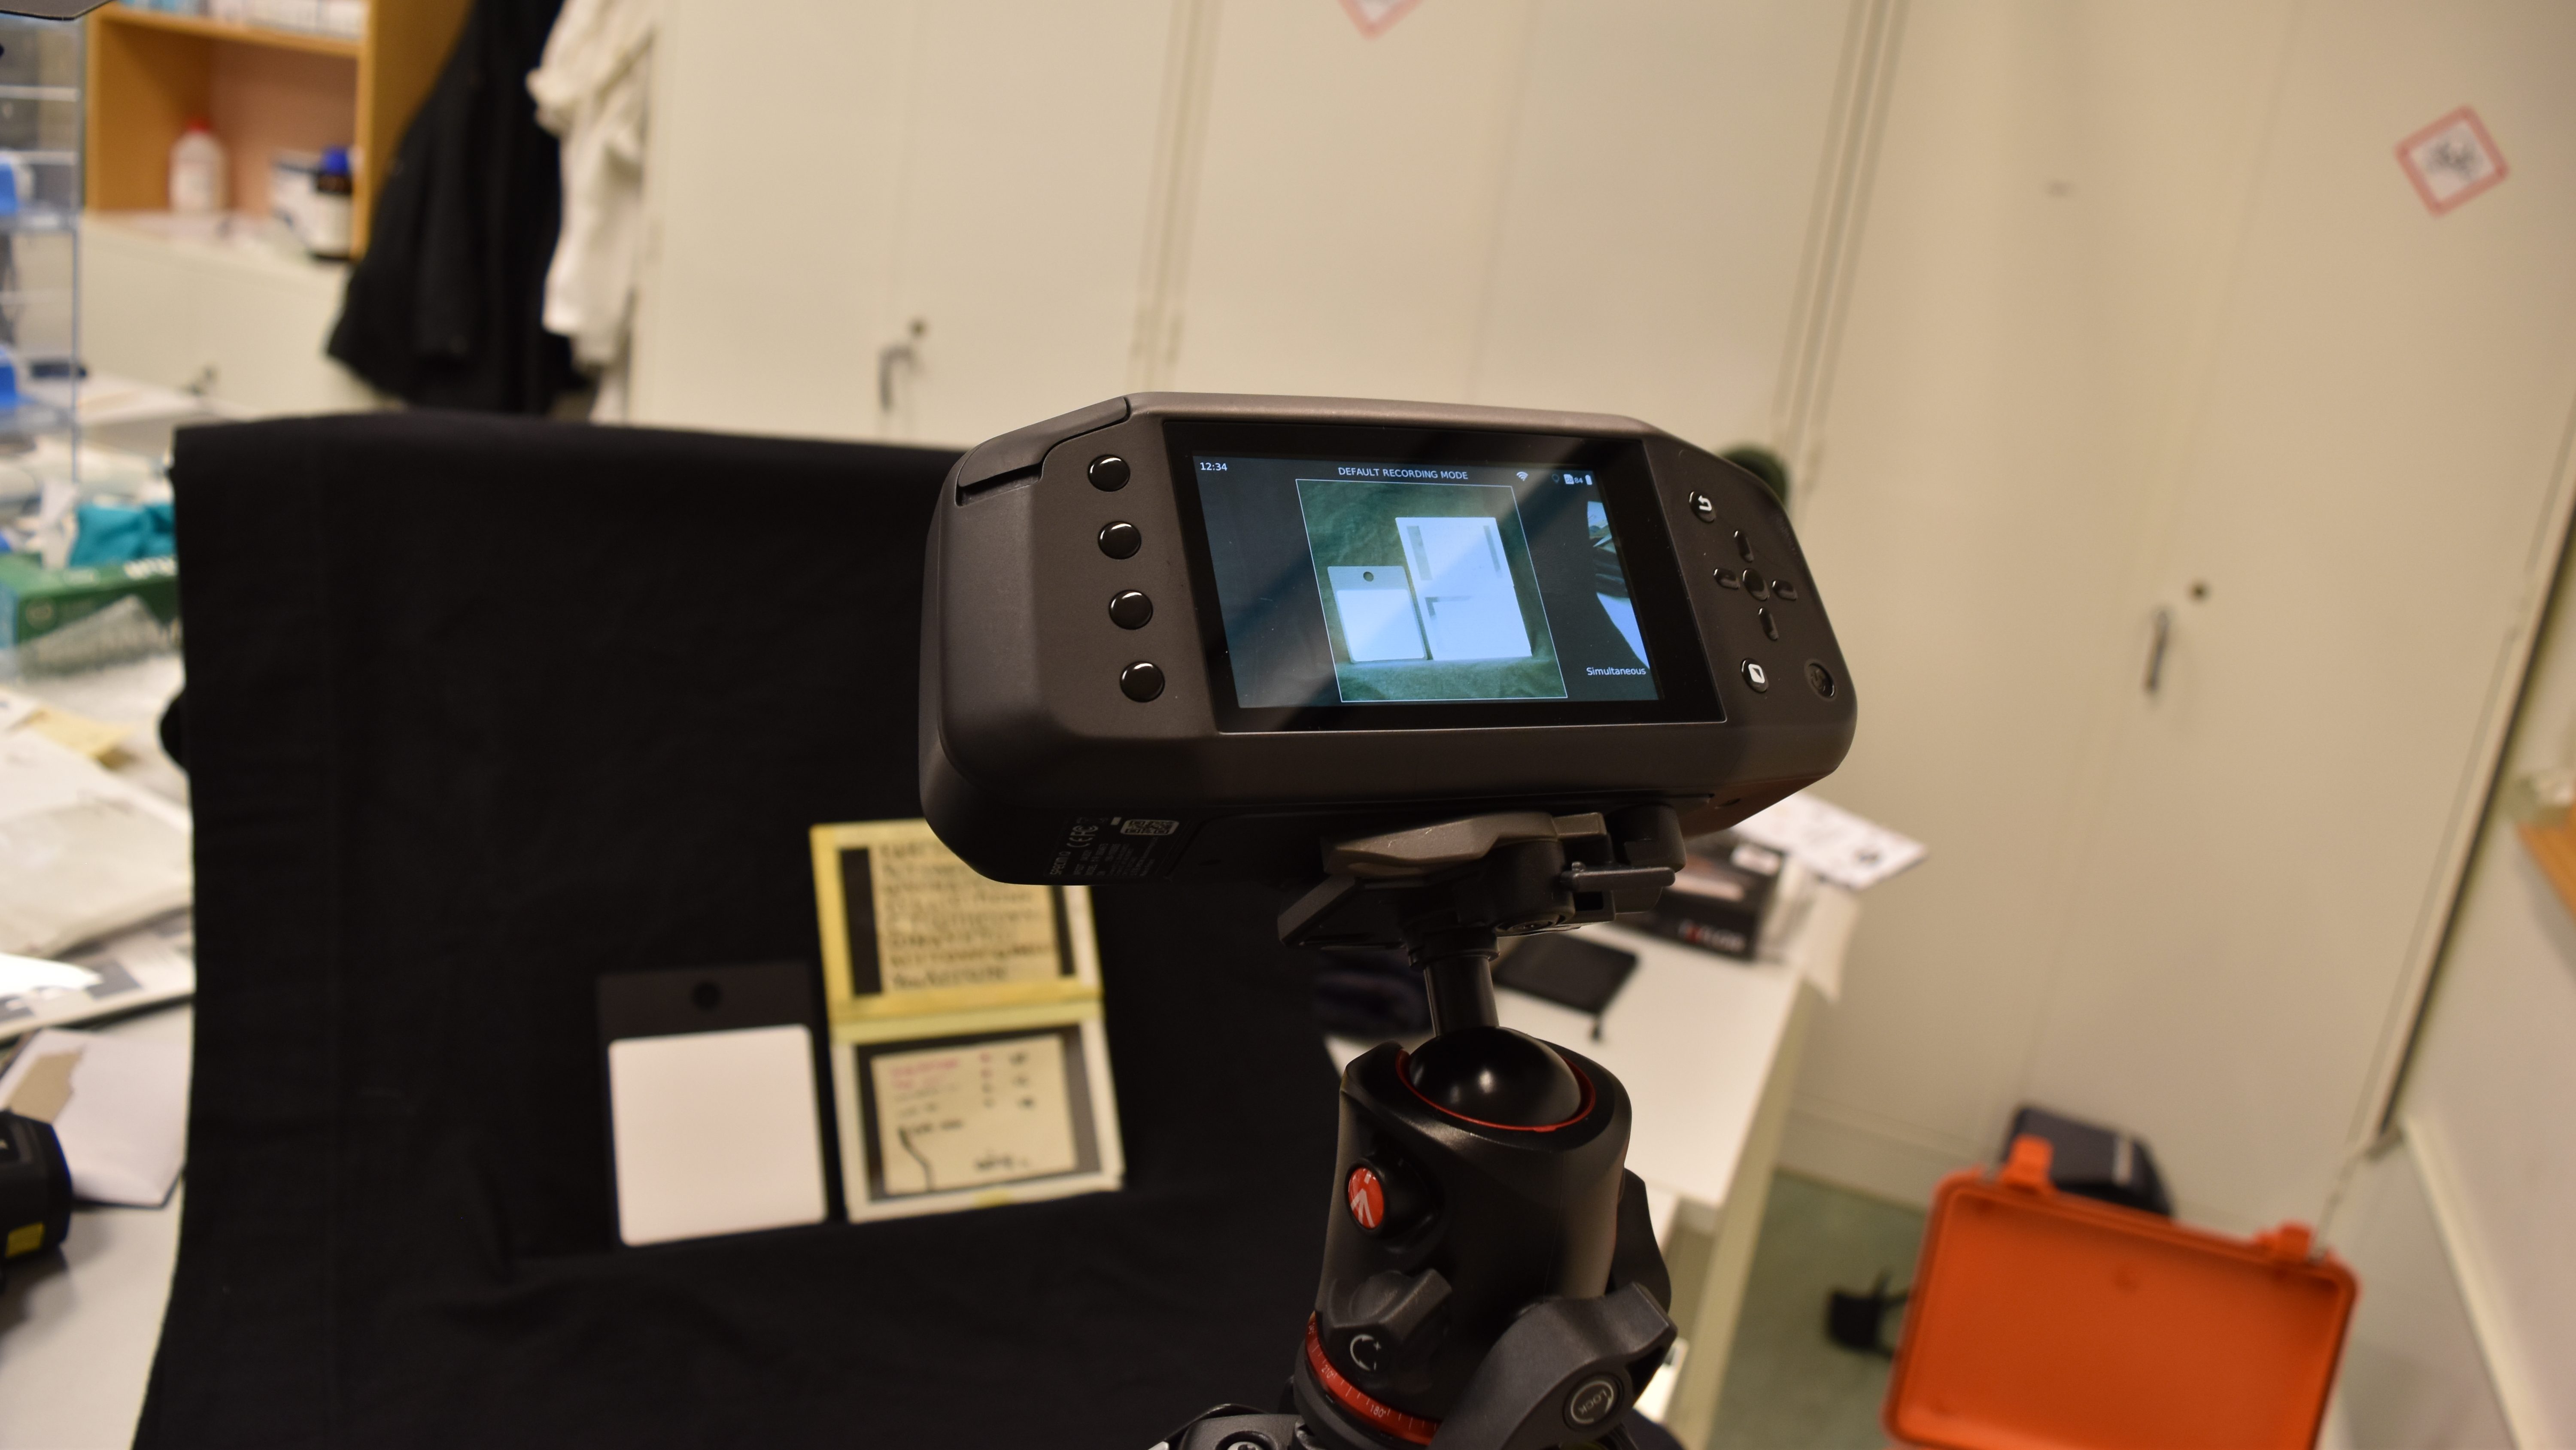
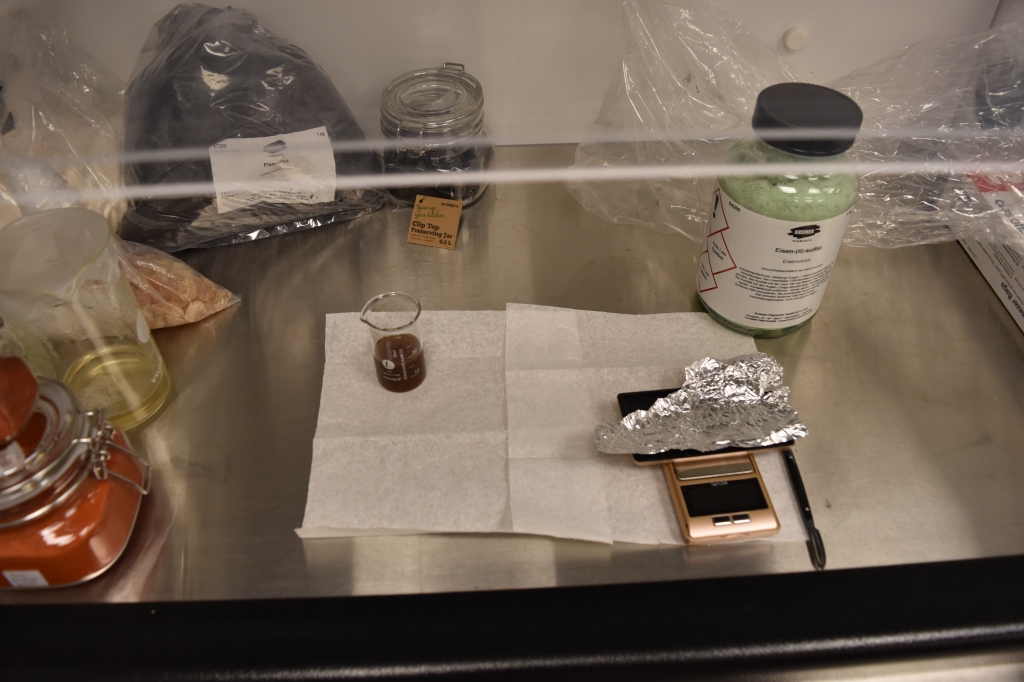
The instrument we used was a portable hyperspectral scanner from Speccim IQ, covering the VNIR region. This was mounted on a tripod, and we made sure that the geometry was at around 45-degree angle.
Tia checking the imaging setup and Despina taking photos.
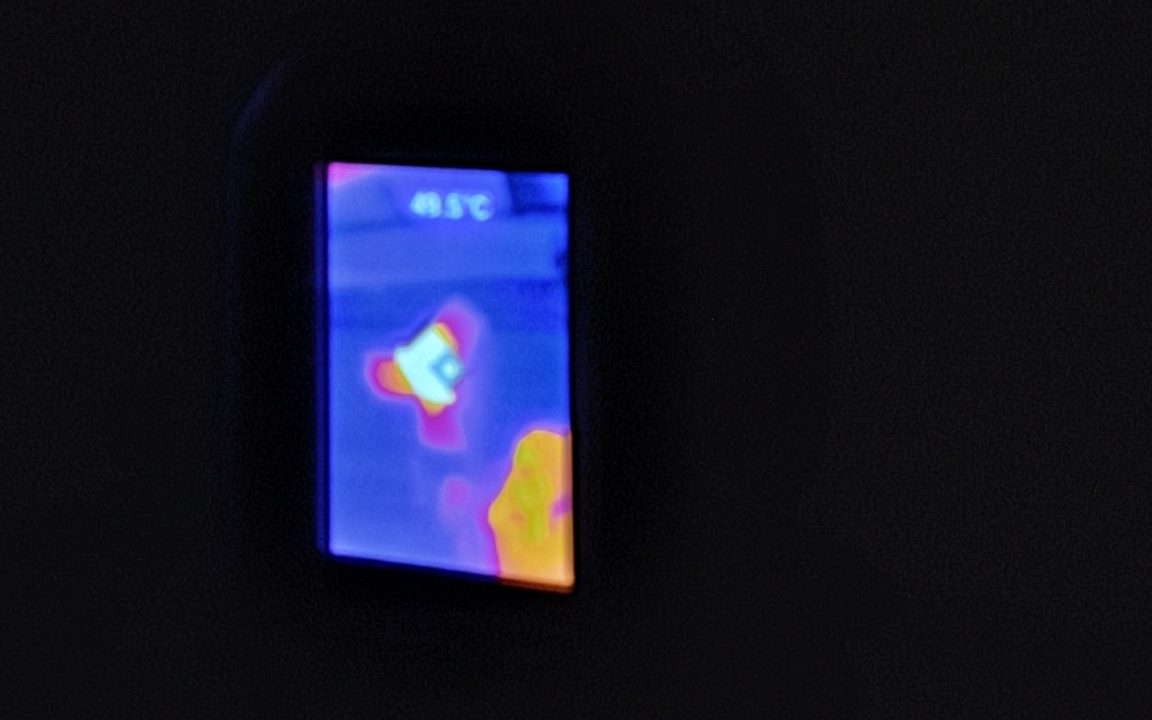
The light source was halogen lamp (200 watts) and the temperature rise was measured with the use of a thermal camera.
Seeing through the camera: the hyperspectral imaging setup with our mock-ups placed behind glass.
We are currently working on the first results and preparing the second phase of this study, which will include different types of glass.
Stay tuned for updates!
Many people contributed to this pilot study, whom we would like to thank:
Hilda Debora and Riestiya (Tia) Zain Fadillah from the Colourlab (NTNU), who set up the hyperspectral imaging experiment.
Anastasia Maravela (IFIKK, UiO) and Federico Aurora (UB, UiO), who kindly lend us spare glass frames.
David Grimaldi (who is currently completing his MA thesis at IFIKK) and Despina Wilson (artist) were extremely helpful throughout the experimental session.
Gall nuts (Aleppo galls, Kremer Pigmente, n. 37400. Photo: AKM).
Iron gall ink is made by mixing plant material containing gallotannic acid (a plant polyphenol), primarily obtained from oak gall nuts (or apples), with hydrated iron (II) sulfate (FeSO4∙7H2O), a compound also known as (green) vitriol.
Oak gall nuts are created by the female oak gall wasps (Cynips Gallae-tinctoria) as a cozy nest to lay their eggs and to provide a nutritious environment for the larvae.
The gall wasp (Image by Judy Gallagher, CC BY 2.0)
According to Kremer pigmente’s information sheet about the oak gall nuts we used for this experiment (last accessed online 09.01.2023), the main constituents of the best quality Aleppo galls, i.e., those collected before the insect escapes the gall, are 50% to 70% gallotannic acid, 2 to 4% gallic acid, mucilage, sugar, resin, and lignin (insoluble matter).
The colourant that gives the dark tones of the produced solution is ferrous gallotannate, a dark brown compound that becomes black after exposure to air with the formation of ferric tannate (oxidation from Fe2+ to Fe3+).
Before their wide use for the manufacture of ink, these tannin-rich sources found numerous applications in antiquity. Pliny the Elder mentions their medicinal properties and their use as a black hair dye (Plin. HN 24.9), dyeing wool and tanning (Plin. HN 16.26-29).
Regarding ink manufacture ancient recipes suggest that, besides galls, a range of tannin-rich plants, such as for example tree bark or fruits and alternative iron sources deriving from everyday-life materials, such as iron nails, could be used for the production (Colini et al., 2021).
For this pilot phase of our study we wanted to experience the workability of the most commonly used materials for the production of iron gall inks (galls nuts, gum arabic, green vitriol).
How easy is it to grind the gall nuts?
Is gum arabic easily dissolved in water?
Can the process be carried out by one single person?
How does the colour of the tannin extract change over time and what is the impact of time on the final product?
There are several recipes out there and we chose to use a well documented and already reproduced recipe, following closely the quantities and process as described by Sara Charles (last accessed online 19.12.2022).
For the extraction of the gallotannic acid, we used:
80 g gall nuts (Kremer pigmente, n. 37400)
300 mL tap water*
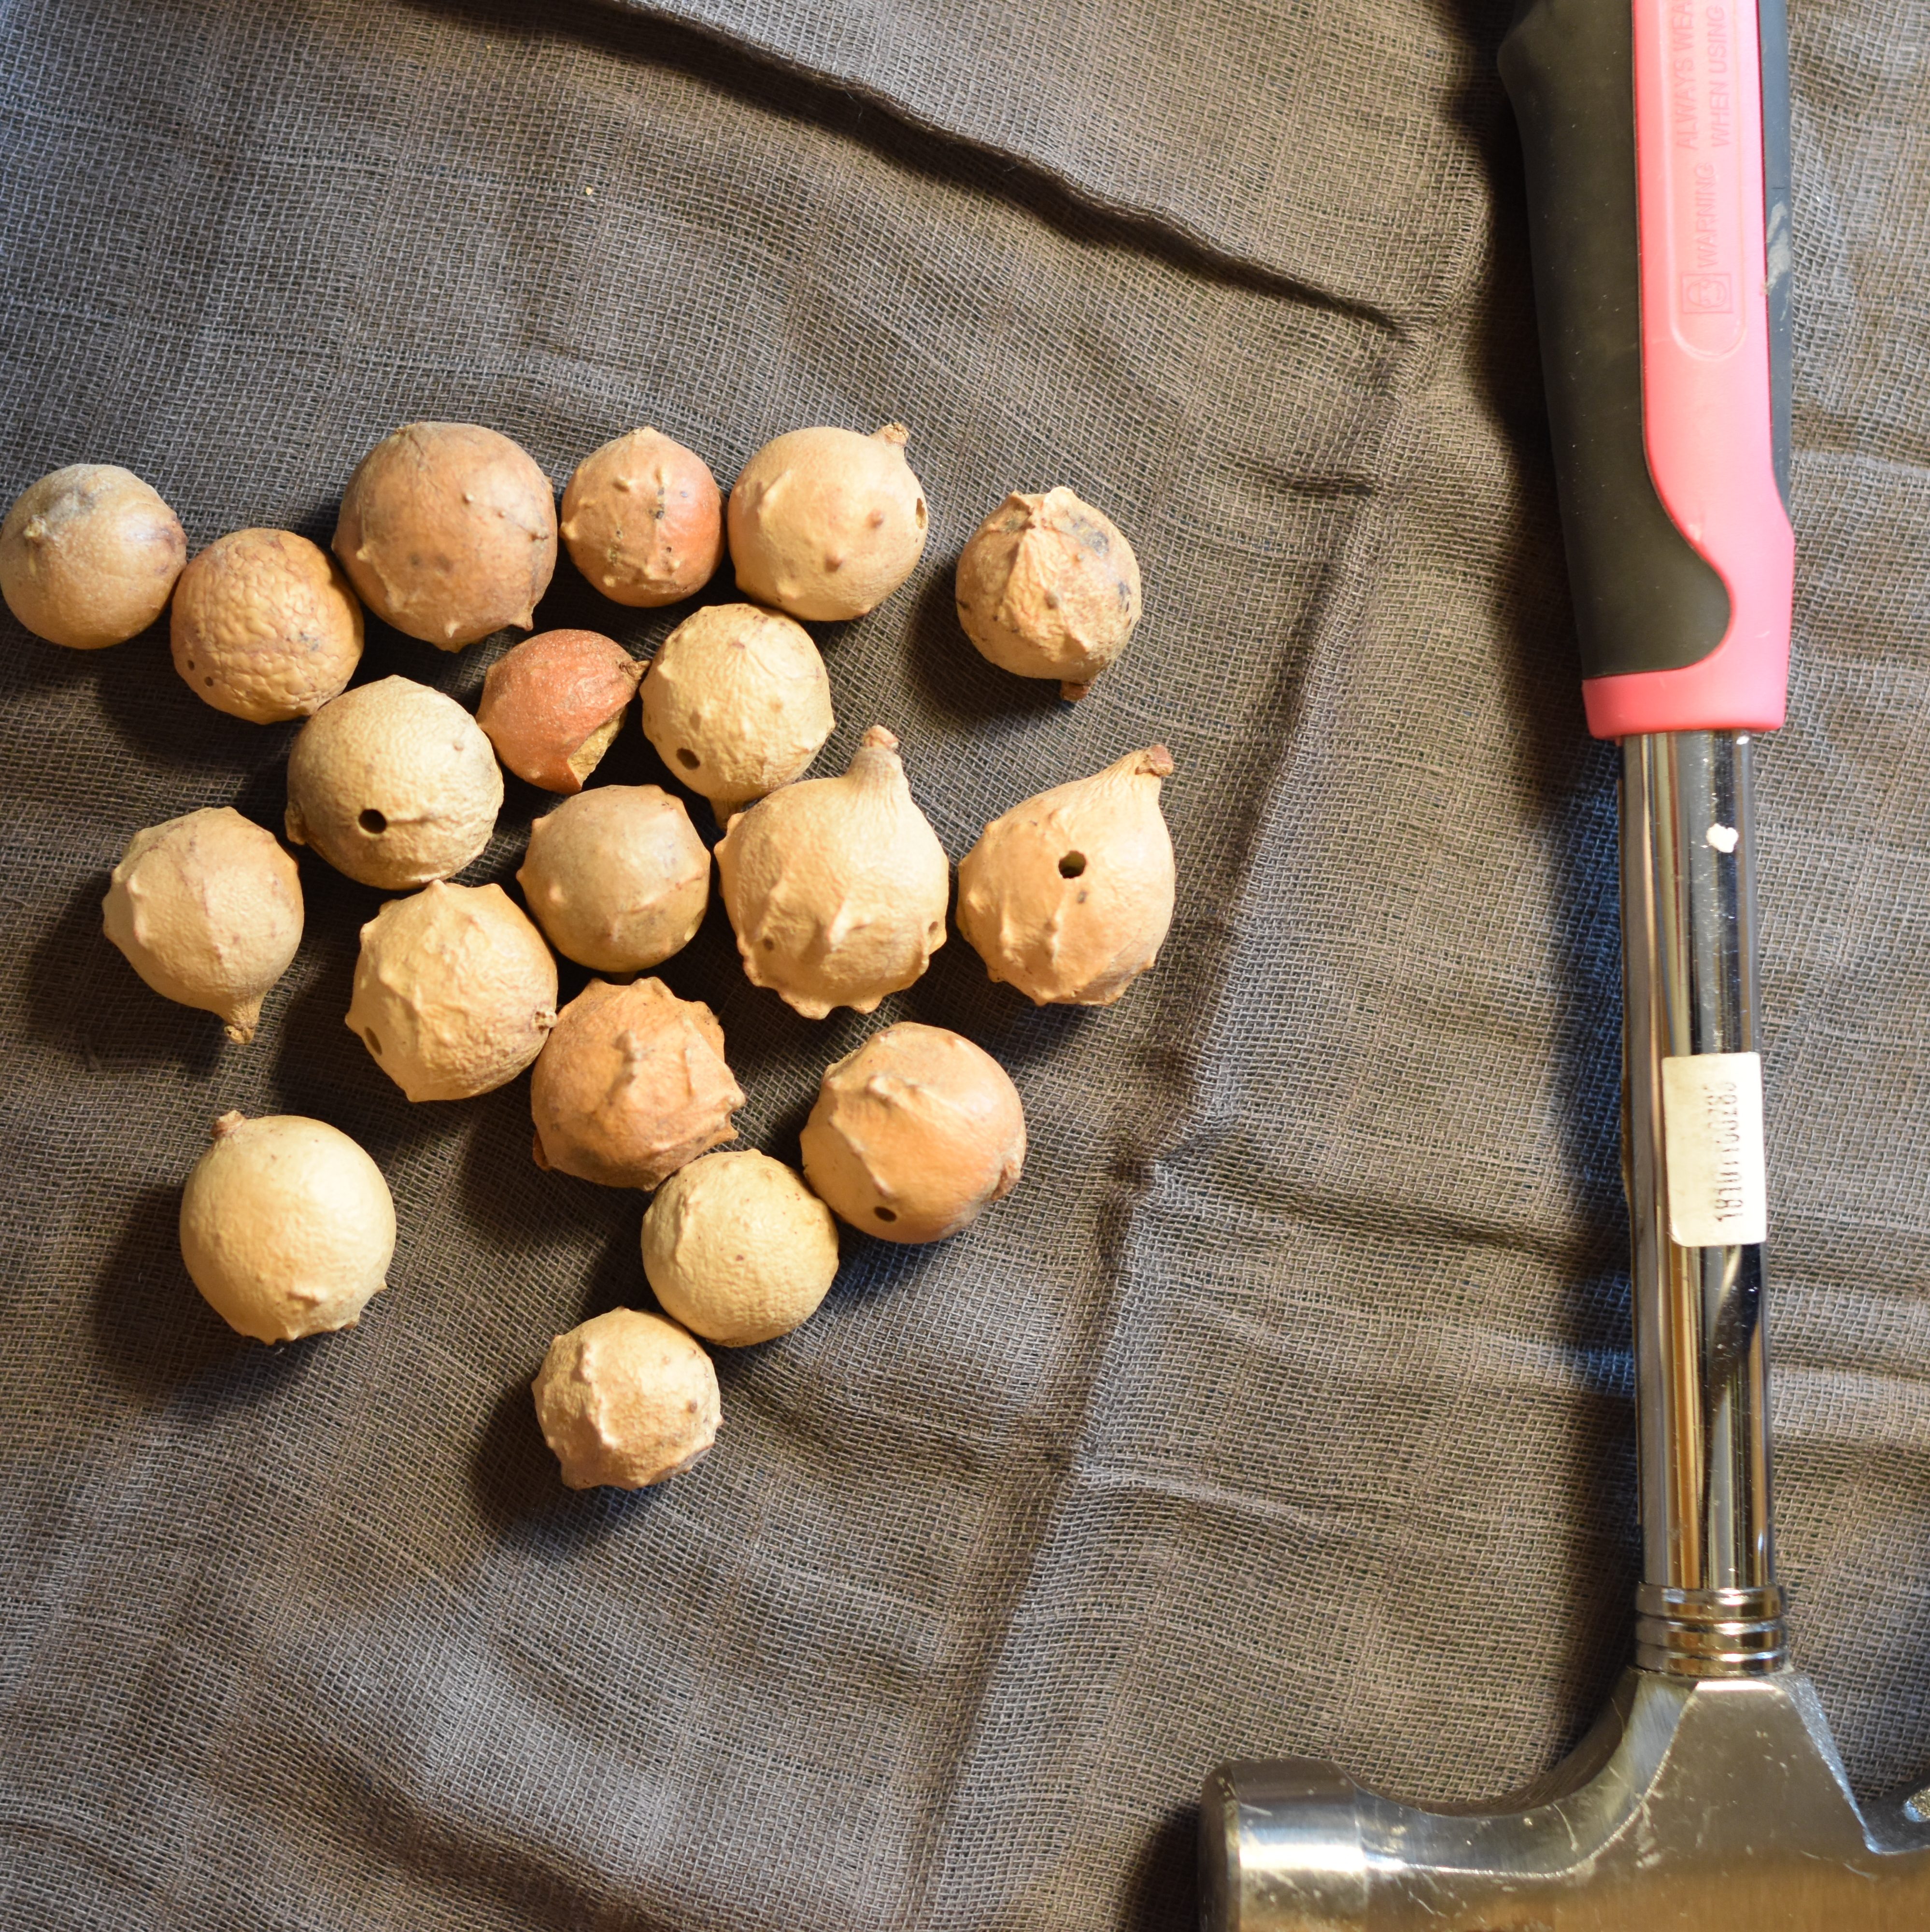
Gall nuts posing with a hammer before being crushed (photo: AKM).
* It was difficult to find distilled water at a regular store in Oslo, so we decided we could afford to use tap water since no chemical analysis is planned at the moment and contamination from the water source was not considered important.
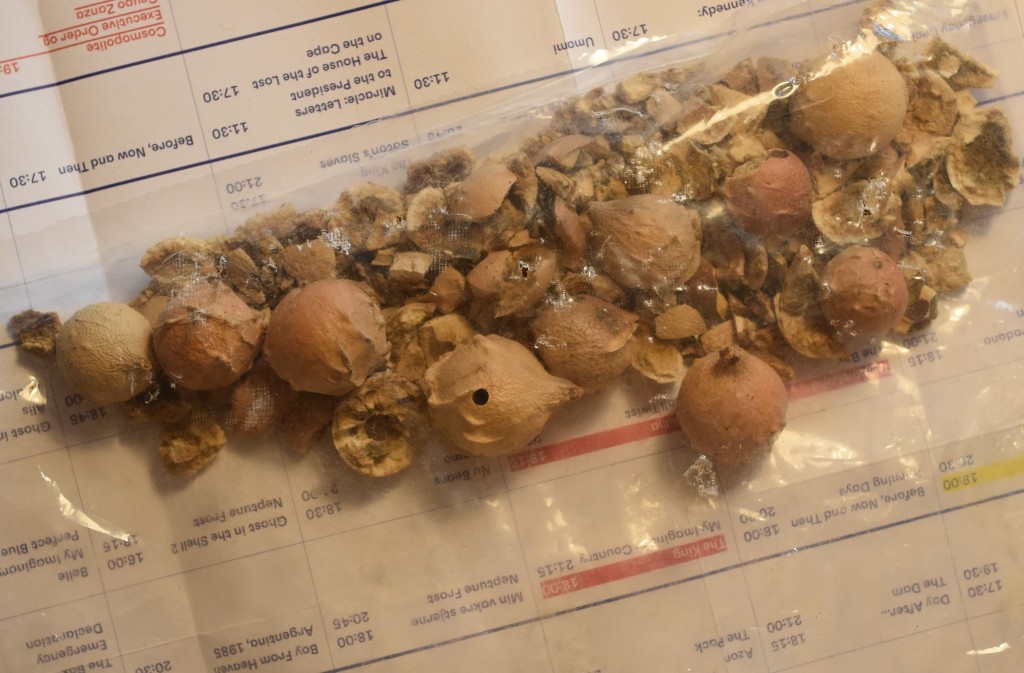
The galls were placed in a transparent plastic bag and wrapped in paper and a cloth, to avoid losing the material through the process of crushing.
Partially crushed galls in a transparent plastic bag (photo: AKM).
And then the pieces were further processed in a marble mortar.
The colour of the crushed galls was pale yellow, pointing to the so-called ‘white galls’, i.e., galls collected after the insects have escaped. These galls contain less gallotannic acid than the best quality ones, which are of darker colour and are collected while the insects are still inside.
The extraction of the tannins without heating takes a few days, so the process had started already at home before we all met at the laboratory of the Department of Archaeology, Conservation and History of the University of Oslo.
At first, the mixture is yellowish:
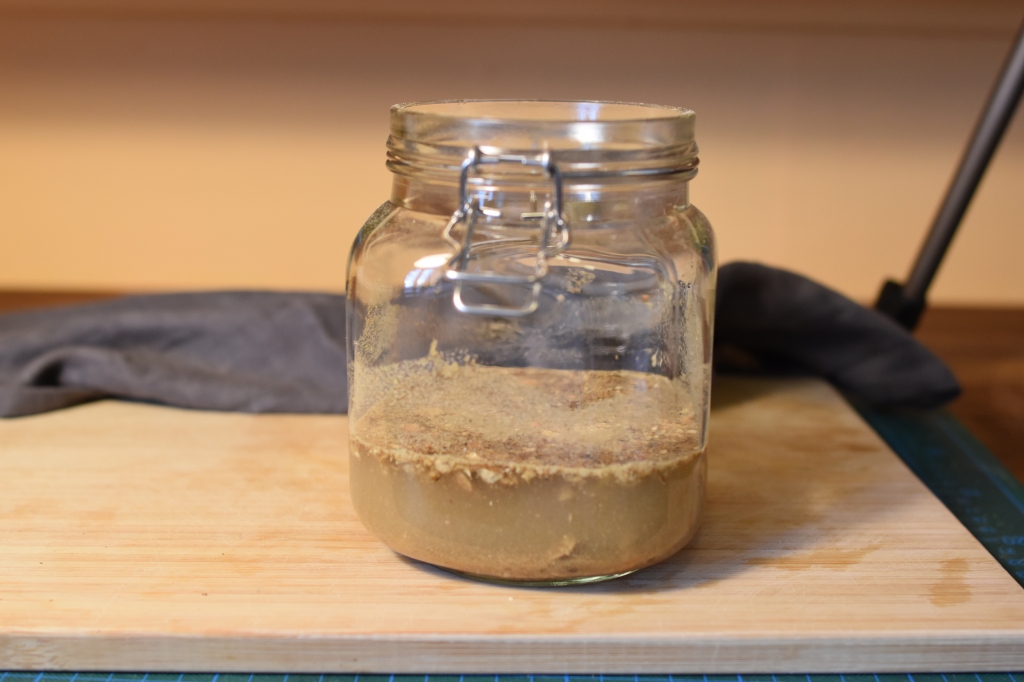
According to the recipe we followed, the container should be placed by the window for three days. Oslo in December is rather dark, and the window could not help with the maintenance of a warm temperature. The jar therefore changed several locations during these three days, according to which place was the warmest and not the sunniest.
After a couple of hours, the mixture was already darker.
The glass jar containing the mixture is placed next to the window. The sun is relatively low since the experiment was carried out in December in Oslo (Norway).
The glass jar changed several positions during the day trying to find the highest temperature.
Three days later, and we were already in the lab setting up the hyperspectral imaging study that aimed to explore the impact of the glass frames that house papyri on the imaging process (part 3).
The mixture had a dark brown colour, indicating the successful extraction of the tannins in the water medium. We strained the solution through a coffee filter and since we wanted a small quantity of ink, we used 70 mL of the dark brown liquid to produce our iron gall ink, mixing it with 40 g of green vitriol and 70 g of gum arabic.
Ingredients for iron gall ink:
70 mL extract from the galls
40 g vitriol (ferrous sulfate FeSO4∙7H2O, from Kremer pigmente, n. 64200)
70 g of powdered gum arabic (Kremer pigmente, n. 63330)
With the addition of vitriol, the solution became intensely black et voilà!
Our ink was ready to use.
Many people contributed to this pilot study, whom we would like to thank:
Hilda Debora and Riestiya (Tia) Zain Fadillah from the Colourlab (NTNU), who set up the hyperspectral imaging experiment.
Anastasia Maravela (IFIKK, UiO) and Federico Aurora (UB, UiO), who kindly lend us spare glass frames.
David Grimaldi (who is currently completing his MA thesis at IFIKK) and Despina Wilson (artist) were extremely helpful throughout the experimental session.
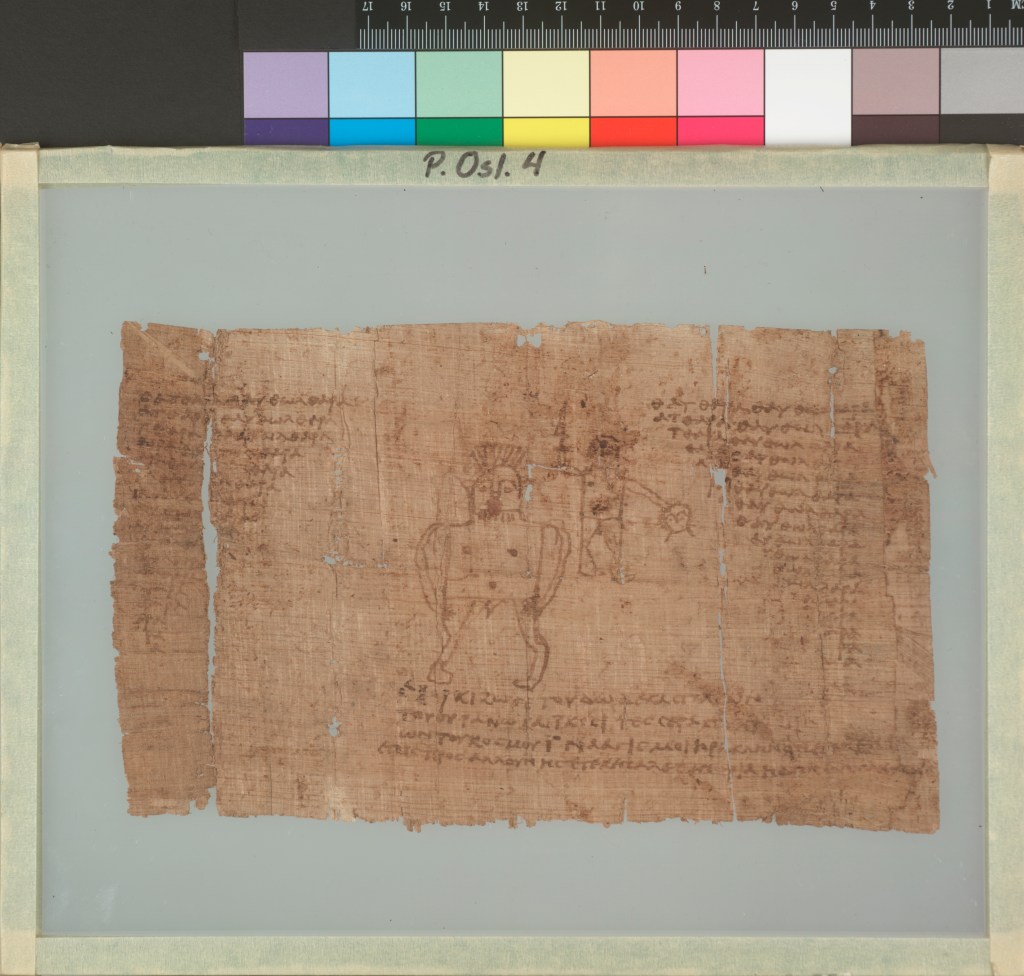
Ancient papyri are most commonly stored and displayed in glass frames, which protect the papyrus and at the same time permit the display of the written surface. The papyrus fragments are basically sandwiched between two glass sheets held together by tape.
P.Oslo I 4 (inv. 434): 4th century CE Egyptian magical papyrus (spell of attraction) from the Oslo Papyrus Collection (image under CC-BY-NC 3.0). The papyrus is sandwiched between two thin glass sheets, which are held together with adhesive tape.
Various types of glass and adhesive tape are used across different collections, with the materials being based on a series of factors, including cost, the display conditions and environment, access to suppliers, etc. (Kaye 2019). Window glass (soda lime glass) has been used traditionally, while the more chemically stable borosilicate glass is gaining ground in recent times and UV radiation protective filters are necessary for papyri that are often on display.
Given the fragile state of surviving papyri, curators are reasonably hesitant to open the glass frames for materials analysis. So, a common technique for preliminary analysis of mounted papyri involves imaging with a portable microscope (namely using a DinoLite microscope with UV and IR light sources) above the glass frame.
This methodology, developed by the research team of Ira Rabin and colleagues (BAM), makes it possible to rapidly scan the manuscript and get qualitative information about the inks based on a simple principle: carbon inks remain black across the spectrum, iron gall inks become less intense (the lines become thinner) under IR illumination (set to 940 nm in the commercially available model of the DinoLite), and plant-based inks tend to disappear at 740 nm (Colini et al. 2021). Moreover, for plant based inks, the contract between the ink and the substrate is expected to increase (ibid.). By comparing the opacity and thickness of the lines, information about the makeup inks can be extracted.
However, this technique relies on the (rather subjective) ability of the researcher to recognise these variations between the three predefined modes of illumination (Vis, IR, UV) and the results are qualitative and descriptive. Hilda Debora and I were wondering if we can use the equipment of the Colourlab (NTNU, Gjovik) for the quantitative measurement of glassed papyrus with hyperspectral imaging.
What would the impact of the glass be on our measurements?
We also decided to make our own inks and apply them on both papyrus and parchment.
The next post (part 2) describes the process of making iron gall ink from commercially available starting materials. The last part of this series (part 3) describes the process of making carbon black ink, starting from commercially available carbon particles and gum arabic and finally the setup of the hyperspectral camera.
Many people contributed to this pilot study, whom we would like to thank:
Hilda Debora and Riestiya (Tia) Zain Fadillah from the Colourlab (NTNU), who set up the hyperspectral imaging experiment.
Anastasia Maravela (IFIKK, UiO) and Federico Aurora (UB, UiO), who kindly lend us spare glass frames.
David Grimaldi (who is currently completing his MA thesis at IFIKK) and Despina Wilson (artist) were extremely helpful throughout the experimental session.
In my previous posts about making a model of Beatty-Michigan codex of the Pauline epistles (P46, TM 61855), I discussed the sizes of the bifolia and the curious fact that P46 seems to lack any evidence for the presence of protective parchment or leather stays in the center of the quire. Another issue related to the absence of evidence for stays is a similar lack of evidence for the presence of a spine lining strip or a cover. Just as the stays prevent the binding thread or tacket from ripping the papyrus leaves at the center of the quire, the spine strip protects the outermost bifolia from the binding agent, and the cover protects the whole codex.
Several of the Nag Hammadi codices have well preserved leather spine strips that are now kept together with the covers. Here is the cover of Nag Hammadi Codex IX (TM 107749). Notice the papyrus scraps that still adhere to the spine strip.
Nag Hammadi Codex IX, inside of leather cover, showing spine strip at center with papyrus fragments still adhering; image source: The Claremont Colleges Digital Library
A spine strip also appears to have been preserved with the Crosby-Schøyen Codex (TM 107771), The darker leather is just visible along the spine in this photograph of the codex before it was disassembled:
Crosby-Schøyen Codex before conservation, showing spine lining strip at left; image source: William H. Willis, “The New Collections of Papyri at the University of Mississippi,” in Leiv Amundsen and Vegard Skånland (eds.), Proceedings of the IX International Congress of Papyrology (Oslo: Norwegian Universities Press, 1961), 381-392, plate 2.
In the case of P46, the absence of evidence for a cover and spine strip is understandable, since the outermost bifolia of P46 did not survive. So, even though there is no surviving evidence for either a spine lining strip or a cover, it seems reasonable to expect that they existed. Based on that reasoning (plus the practical point that threads cut right through the papyrus without a spine strip), I added a leather spine strip to the model I made.
Model of P46 showing a hypothetical spine lining strip, snake weight at right to keep the quire closed
I decided not to put a cover on this model, but I am pretty firmly convinced that P46 and indeed most papyrus codices, probably had covers. I recall reading somewhere (I can’t come up with the exact reference) that perhaps the presence of covers on papyrus codices was exceptional. I find this a bit difficult to believe for a couple reasons.
First, papyrus codices, especially single quire codices, tend not to stay closed. There is a snake weight in this image above to hold the codex shut because what it “wants” to do is spring open. A cover with a flap and ties keeps the codex codex closed.
Second, papyrus leaves do not do well without some form of protection. This quire endured just a few trips between office and house in my backpack, and it already has begun to show signs of wear at the edges.
Papyrus books with leather covers, however, are surprisingly durable. The model I made of Nag Hammadi Codex VI can be shaken around by the cover and generally abused without showing any significant damage. I think this kind of cover must have been the norm for papyrus codices in antiquity.
In my first post about making a model of P46 (TM 61855), the papyrus codex of Paul’s letters in Greek that is split between the Chester Beatty Library in Dublin and the University of Michigan, I discussed the different sizes of the bifolia. Now I want to turn to the elements that usually protect the central folds of papyrus codices, the stays on the inside of the quire. In the case of P46, these items do not survive (if they ever existed at all).
The single-quire papyrus codex is a relatively straightforward construction. A stack of papyrus sheets folded in half and bound. The binding can either be directly through the central fold or “stabbed” through the codex from front to back.
For larger (that is to say, thicker) single-quire codices, it seems as though binding through the central fold would be the more practical option. From ancient examples that have survived in a relatively good state of preservation, like several of the Nag Hammadi codices, we have learned to expect leather or parchment stays at the center of the quire in order to protect the papyrus from being torn by the pressure of the binding agent, whether it is thread or a leather tacket.
In the image below of Nag Hammadi Codex VI (TM 107746), which was bound with two leather tackets through two leather stays, the lower stay is visible, still in place:
Nag Hammadi Codex VI, opened to the center of the quire, with lower leather stay in place (the upper stay is obscured by a feather; the hand belongs to Marianne Doresse; image source: The Claremont Colleges Digital Library
(Side note: Does anyone know if there are other images showing the Nag Hammadi books with the stays in place before they were disassembled?)
Stays have survived in several of the Nag Hammadi codices. When the papyrus leaves of the Nag Hammadi books were removed and mounted, the stays were stored together with the covers. The cover and stays of Codex VI are now in the Bibliotheca Alexandria:
In other surviving single-quire codices, the stays have survived only occasionally. But when such stays are absent, there is often evidence that they were once present in the form of stains or discoloration on the central bifolium in exactly the place(s) where we might expect stays. We see this in the Bodmer Menander codex (TM 61594):
Bodmer Menander Codex, center of quire; image adapted from separate images from the Bodmer Lab
A similar discoloration (lightening) can be seen in the central bifolium of the Crosby-Schøyen codex (Schøyen MS 193, TM 107771). With the Berlin Proverbs codex (Staatsbibliothek zu Berlin, Ms. or. oct. 987, TM 107968), which has been rebound in a modern binding, we have a glass frame that preserves a parchment strip that was almost certainly the stay from the center of the quire:
Remains of the parchment stay, unidentified piece of leather, and binding thread from Staatsbibliothek zu Berlin, Ms. or. oct. 987; image source: Paola Buzi, The Manuscripts of the Staatsbibliothek zu Berlin preussischer Kuluturbesitz, Part 4 (Stuttgart: Franz Steiner, 2014), plate 5a.
This all makes sense. When papyrus is folded, it weakens. When it is punctured for binding, some reinforcement would seem necessary around the points of friction between the papyrus and the binding agent. I have learned from unpleasant experience that binding threads or leather tackets will rip right through a whole stack of papyrus sheets if they are unprotected. So, it’s quite curious to me that there does not seem to be evidence for any protective stays at the center of the single quire that makes up P46.
If we digitally reunite the now separated halves of the bifolium at the center of the quire, we see no evidence of stays (the color mismatch between the two folia here seems to be due to different conditions during photography):
There is evidence of two pairs of binding holes through the central fold of the codex, but there is no evidence (at least as far as I am aware) for the presence of stays. I’m genuinely puzzled as to how the binding would have worked without stays. For my model, I used linen thread and included a pair of parchment stays just to make the codex stable and usable:
Model of P46, open to the center of the quire
If I were to do it again, I would probably use leather stays, as the parchment stays have already begun to tear slightly under the pressure of the binding threads.
In the next post, I’ll talk about some other aspects of the model.
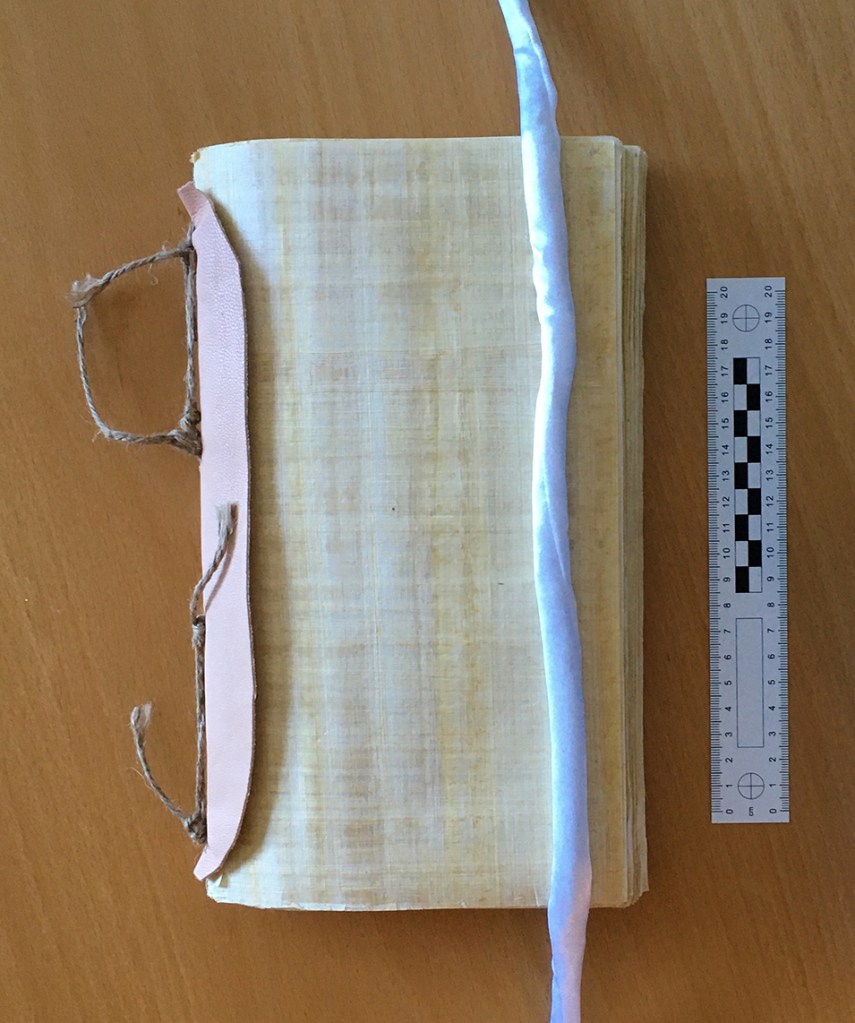
One of the most useful exercises to do when trying to understand the construction of an early codex is to build a model. With early codices, it is always the case that we don’t have all the information that we need to accomplish this with total accuracy, but the process of making a model helps bring to light some of the unanswered questions. I’ve mentioned on the Variant Readings blog some of the models I’ve made in the last few years–for instance, Nag Hammadi Codex III (TM 107743) and Codex VI (TM 107746).
In connection with an article I recently wrote, I made a model of the papyrus codex containing Paul’s epistles in Greek split between the Chester Beatty Library and the University of Michigan (a.k.a. P46, TM 61855). It is another single-quire codex. It’s the largest (that is to say, the thickest) codex that I have tried to make. Nag Hammadi Codex VI had 20 bifolia, Codex III had 40 bifolia, and P46 is estimated to have had 52 bifolia. Only 43 bifolia survive, but the pages of the codex were numbered, so the reconstruction of the size of the quire is reasonable (though not certain, as I discuss in the aforementioned article).
Over the next few posts, I’ll describe some the issues I encountered in making the model. The feature item I’ll discuss is the size of the bifolia.
When a thick single quire is folded in half, the innermost sheets protrude. Ancient bookmakers solved this problem by making the outermost bifolia of the quire broader than those in the center of the quire. In the case of the better preserved Nag Hammadi codices, this change in size can be clearly documented with leaf by leaf measurements. P46 is a bit more damaged, and so we must do some estimation to determine the original dimensions of its bifolia. The breadth of the central bifolium of P46 is reasonably well preserved, with just a bit of wear on the edges. The original breadth was likely about 26.8 cm. The outermost bifolia of the codex have not survived, and the outermost bifolia of the codex that do survive are quite damaged. In his thorough PhD dissertation on P46, Edgar Battad Ebojo has estimated that the outermost bifolium of the quire likely measured about 32 cm (based on the measurements of the largest surviving bifolia). So, between the innermost and outermost bifolium, there was likely a difference of just about 5 cm, as illustrated below.
Outermost (top) and central (bottom) bifolia for a model of P46
With a total of 52 bifolia, each bifolium should be about 1 mm less wide than the previous one from outside to inside. So I decreased the breadth of each sheet by 1 mm as I cut them. The resulting stack looked like this:
Stack of bifolia with decreasing breadth to be used in a model of P46
Even with this adjustment, however, I found that the central bifolia still protruded a bit when the quire was folded.
Model of P46, view of the top of the quire showing protruding central bifolia
I had similar results with my model of Nag Hammadi Codex III:
Model of Nag Hammadi Codex III, view of the top of the quire showing protruding central bifolia
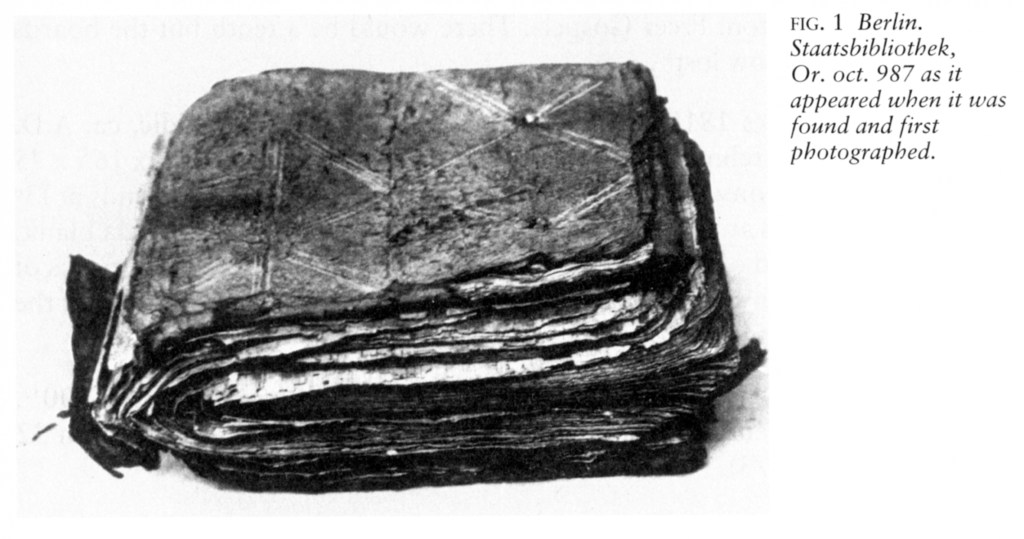
I suspect that these large single-quire codices in antiquity probably did have this uneven fore-edge. I am aware of only one good photograph of an ancient intact single-quire codex that clearly shows the fore-edge; this is the Berlin Akhmimic Proverbs codex (TM 107968). The codex is of course damaged, but it does appear that the central bifolia protrude quite noticeably (and this in spite of the fact that the outermost bifolium is about 4 cm broader than the central bifolium). (Side note: I’m unsure of the ultimate source of this photo; I found it in Sharpe’s chapter, but I don’t know where he got it. I would love to have an image developed from the original negatives, as there are many details that cannot be made out in this scan.):
Image source: John Lawrence Sharpe, “The Earliest Bindings with Wooden Board Covers: The Coptic Contribution to Binding Construction.” Pages 2.455-2.478 in Carlo Federici and Paola F. Munafò (eds.), International Conference on Conservation and Restoration of Archival and Library Materials; 2 vols. (Rome: Istituto centrale per la patologia del libro, 1999)
It is sometimes suggested that the fore-edge of single-quire codices could have been trimmed after binding to achieve a flat endge (e.g. in James Robinson’s writings on the Nag Hammadi codices). This is in theory possible, but I wonder how, in practical terms, such trimming would have been carried out in antiquity (I’m genuinely curious; suggestions are welcome!). It seems like it would be a tricky procedure with ancient cutting tools. For now, my assumption is that the bifolia of single-quire codices were cut to size before folding.
In the next post, I’ll discuss the binding of P46 and the use of stays in single-quire codices.